... weaved a little magic this Easter!
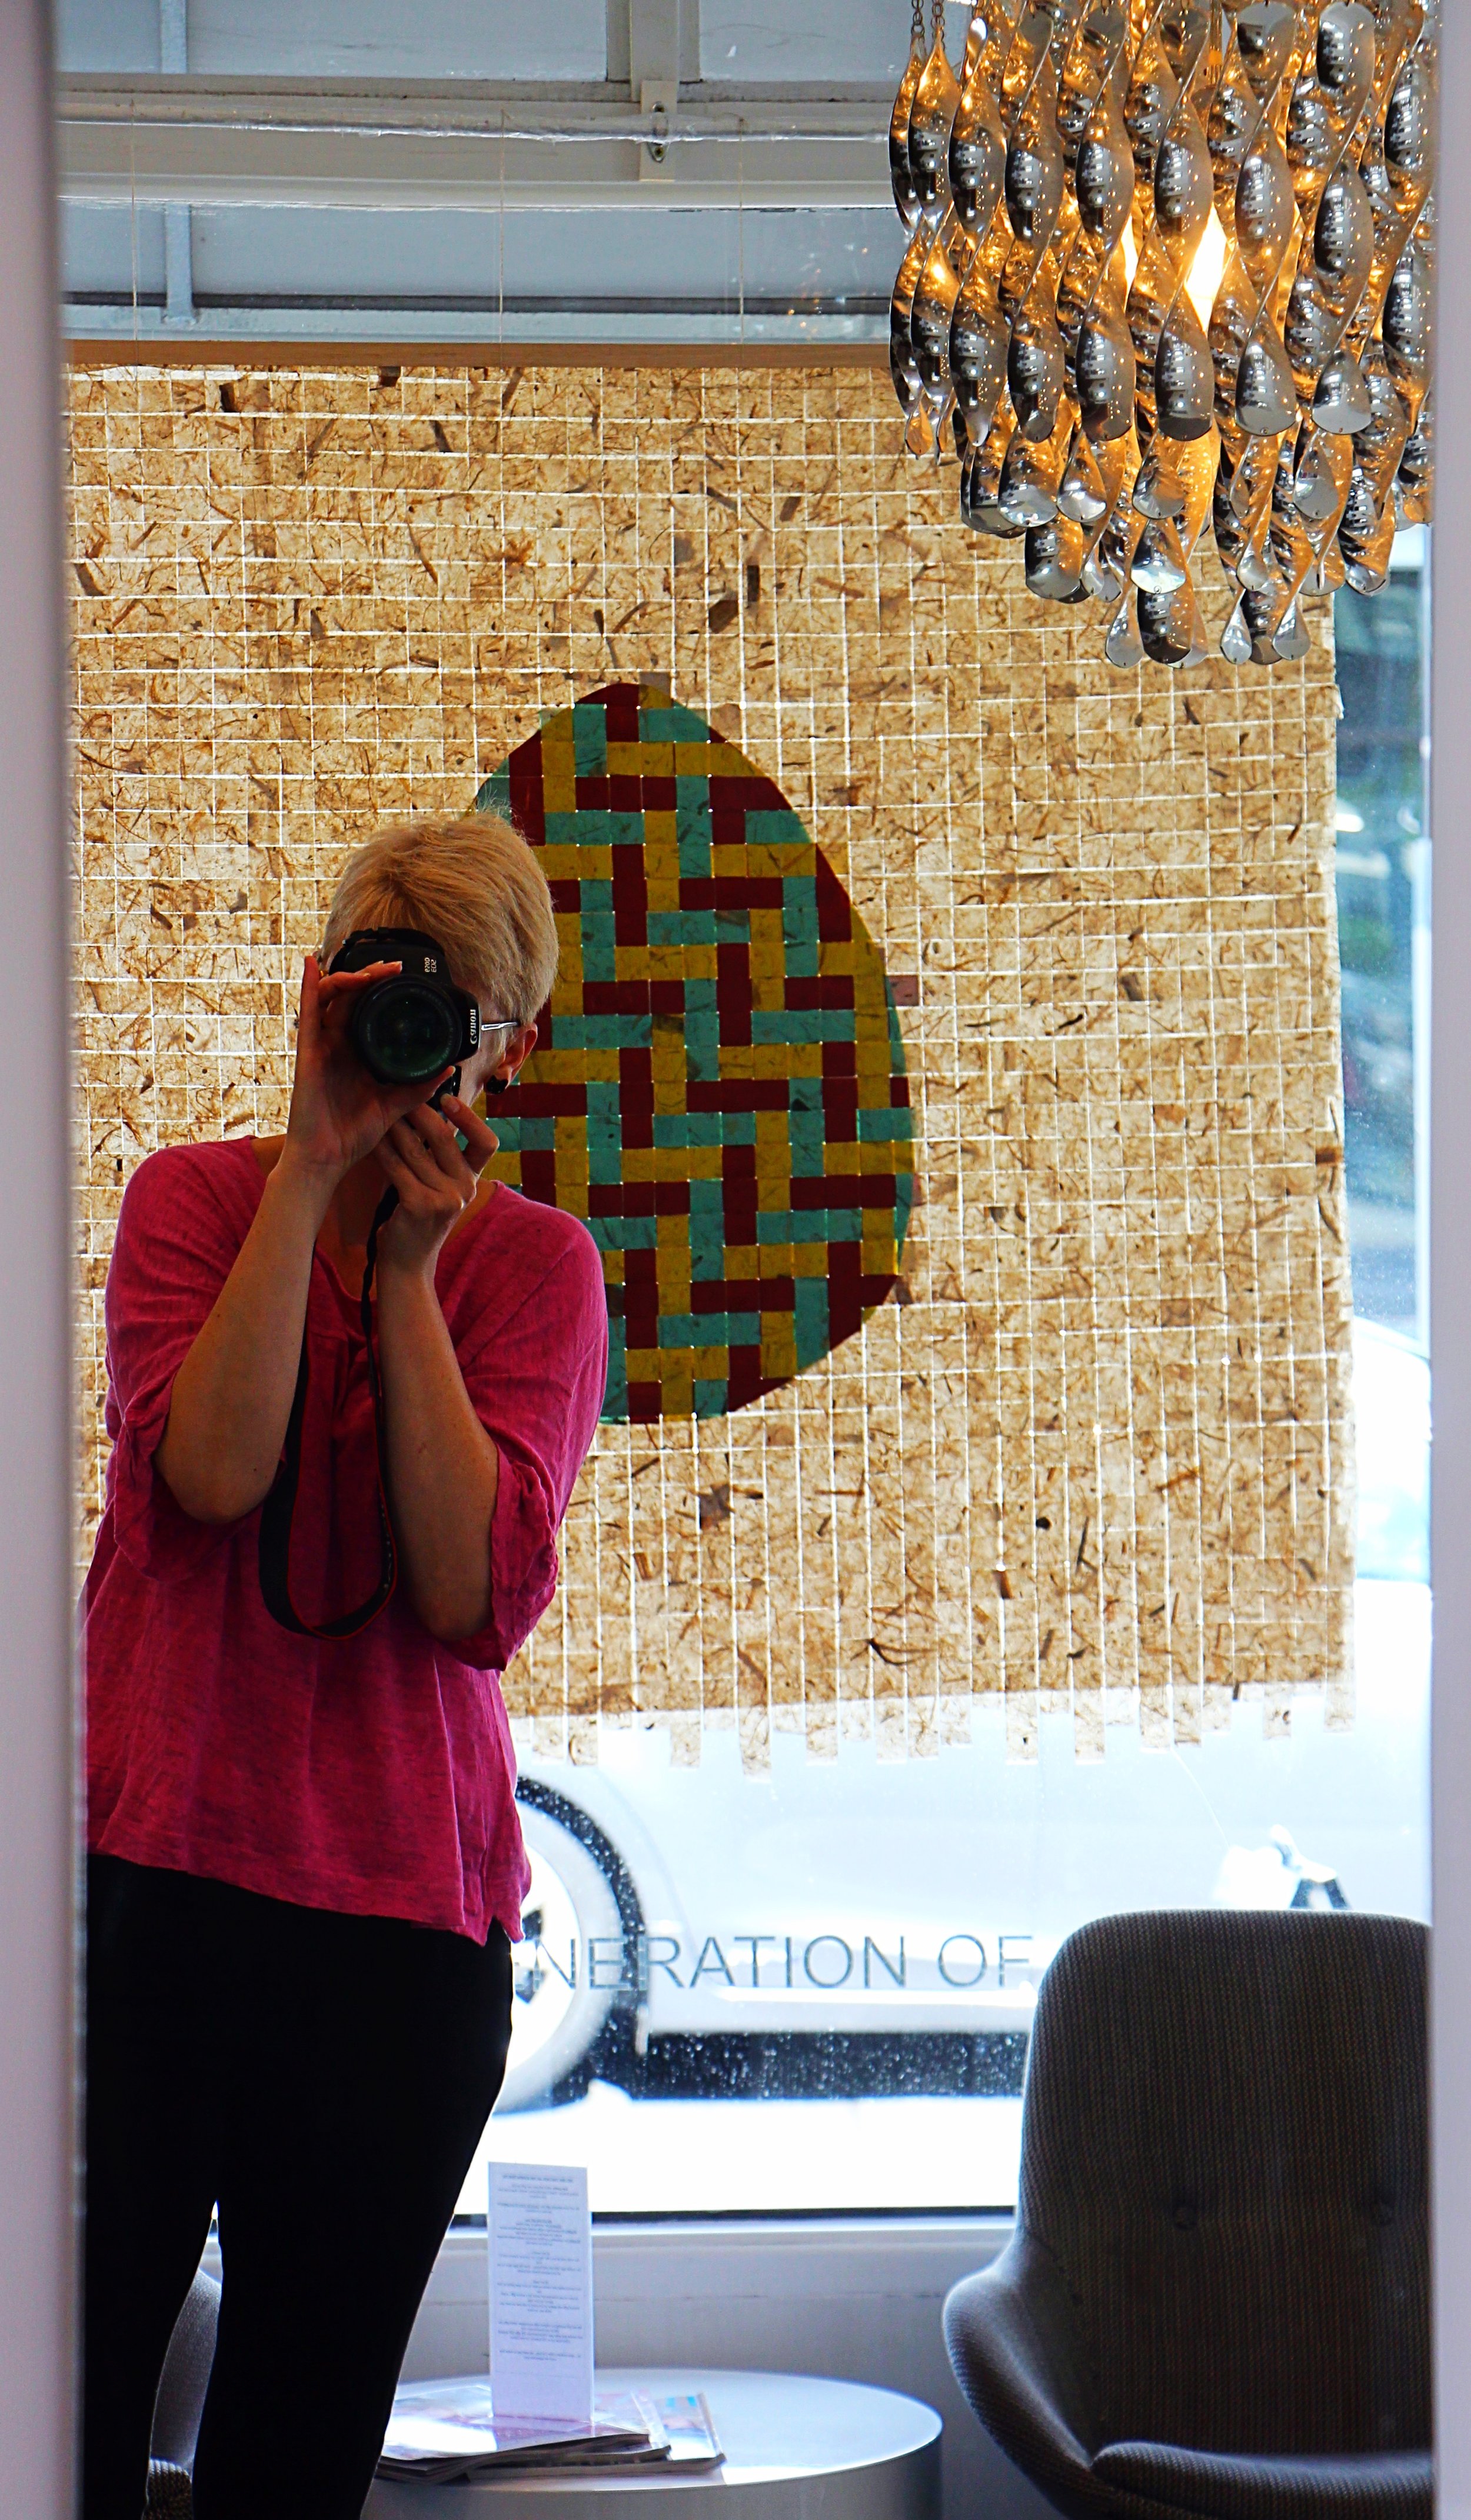
I am thrilled with my latest creation for Orb Hair, on James St at New Farm, in celebration of Easter this year … a giant woven egg!
I came across stunningly beautiful banana leaf handmade papers in natural, turquoise, red and saffron tones at Kami Paper in Melbourne’s Fitzroy. The colours and textures (each sheet is embedded with natural fibres and banana leaves) are so very special against natural light.
I cut the papers into 3cm strips (approximately) and made each piece about 1.2m in length before then weaving the strips ‘under and over’ until I had a big square woven blanket. I used the natural paper as the backdrop for the patterned, colourful egg! I was careful to weave the coloured eggs in the same place on both the front and reverse of the work to minimise any potential shadow effects and mainly, so the shape would be a feature of both sides.
Here are some pics of the work in process …

A close up of the beautiful handmade natural fibre/banana leaf papers I used. This one is turquoise in natural light.

Here is the ‘backdrop’ my square (1.2m x 1.2m) of woven natural toned paper (taken in candle light as I finished one evening!).

… to make the ‘egg’ centrepiece, I wove the different coloured strips through the natural ones.

I then trimmed the strips to form the edge of the egg.

Ta da!

I’m so very pleased with it. The papers as against the natural light in the window are just beautiful!
Peek-a-bo!
Hatching 🐣 another idea ... coming soon!

Back to school!
It is another little ritual chez Shaw come the last week of January each year (see earlier posts!) to transform what are otherwise quite mundane exercise books into treasured works of art. I collect papers of all sorts (including for e.g. old stamps and cigar and chewing gum/bubble gum wrappers) and my children and I have a field day examining them all and experimenting with their suitability for book-covering or … as we played with this year … collage! The kitchen table hasn’t been used for its proper purpose for about 3 days now (well, actually, that’s not altogether uncommon here in any event!). We all had so much fun working on these together and think they are beautiful enough to adequately pleasantly distract come any fleeting (hopefully not too frequent!) moments of boredom! Here are a few more …


Queensland Museum Anzac Legacy Gallery
I am very honoured to have our Peace Crane Project (for the U.N.’s International Peace Day 2014) featured in the permanent Queensland Museum’s Anzac Legacy Gallery. The curators and design team at the museum did a truly beautiful job and I am especially grateful to David Hampton for his assistance. It was a real thrill and a little overwhelming to see the exhibit, incorporating my photography and senbazurus (made with my children and also, those made by members of the community) for the first time today. The project was deeply significant to me in many ways and I will be forever grateful to everyone who contributed either through initiating conversations about human rights, violence and peace; folding cranes for the installation or donating money to Amnesty International. Thank you! :)

Peace Crane Project 2014 exhibit within the Anzac Legacy Gallery, Queensland Museum, Brisbane.

The plaque commemorating our project.
Love Love Love
Here’s to love in all its forms … including labours of love and I love this labour so much!
I recently completed this big red heart sculpture for Orb Hair at New Farm in celebration of Valentine’s Day this year.
The work was inspired by … my recent travels to Japan; some beautiful fabrics I came across on my travels; geometry (of spheres and hearts), ‘the legend of the red string of Japan’ and the very organic, fragile and oh so complex nature of our human hearts and relationships.
I used paper and polystyrene balls, different red tones of cotton linen, many many floristry pins, red wool, fishing line and doll needles to construct the work. The cotton linen drapes beautifully and when wrapped around the spheres, resembles another symbol of Valentine’s Day in red roses (either budding or in full bloom depending on the quantity of fabric at the ‘top’ of each sphere). I alternated between ‘tops’ and ‘bottoms’ of these little wrapped red parcels being visible on either side of the installation and appropriately, too, also the sphere ‘bottoms’ somewhat resemble foiled chocolates! So, an abundance of Valentine’s Day symbolism!
The afternoon sun on the day I hung the heart rendered photography a little challenging but I did my best and may upload a few more from another angle soon.
So, happy Valentine’s Day from me … albeit a wee bit early! ❤️
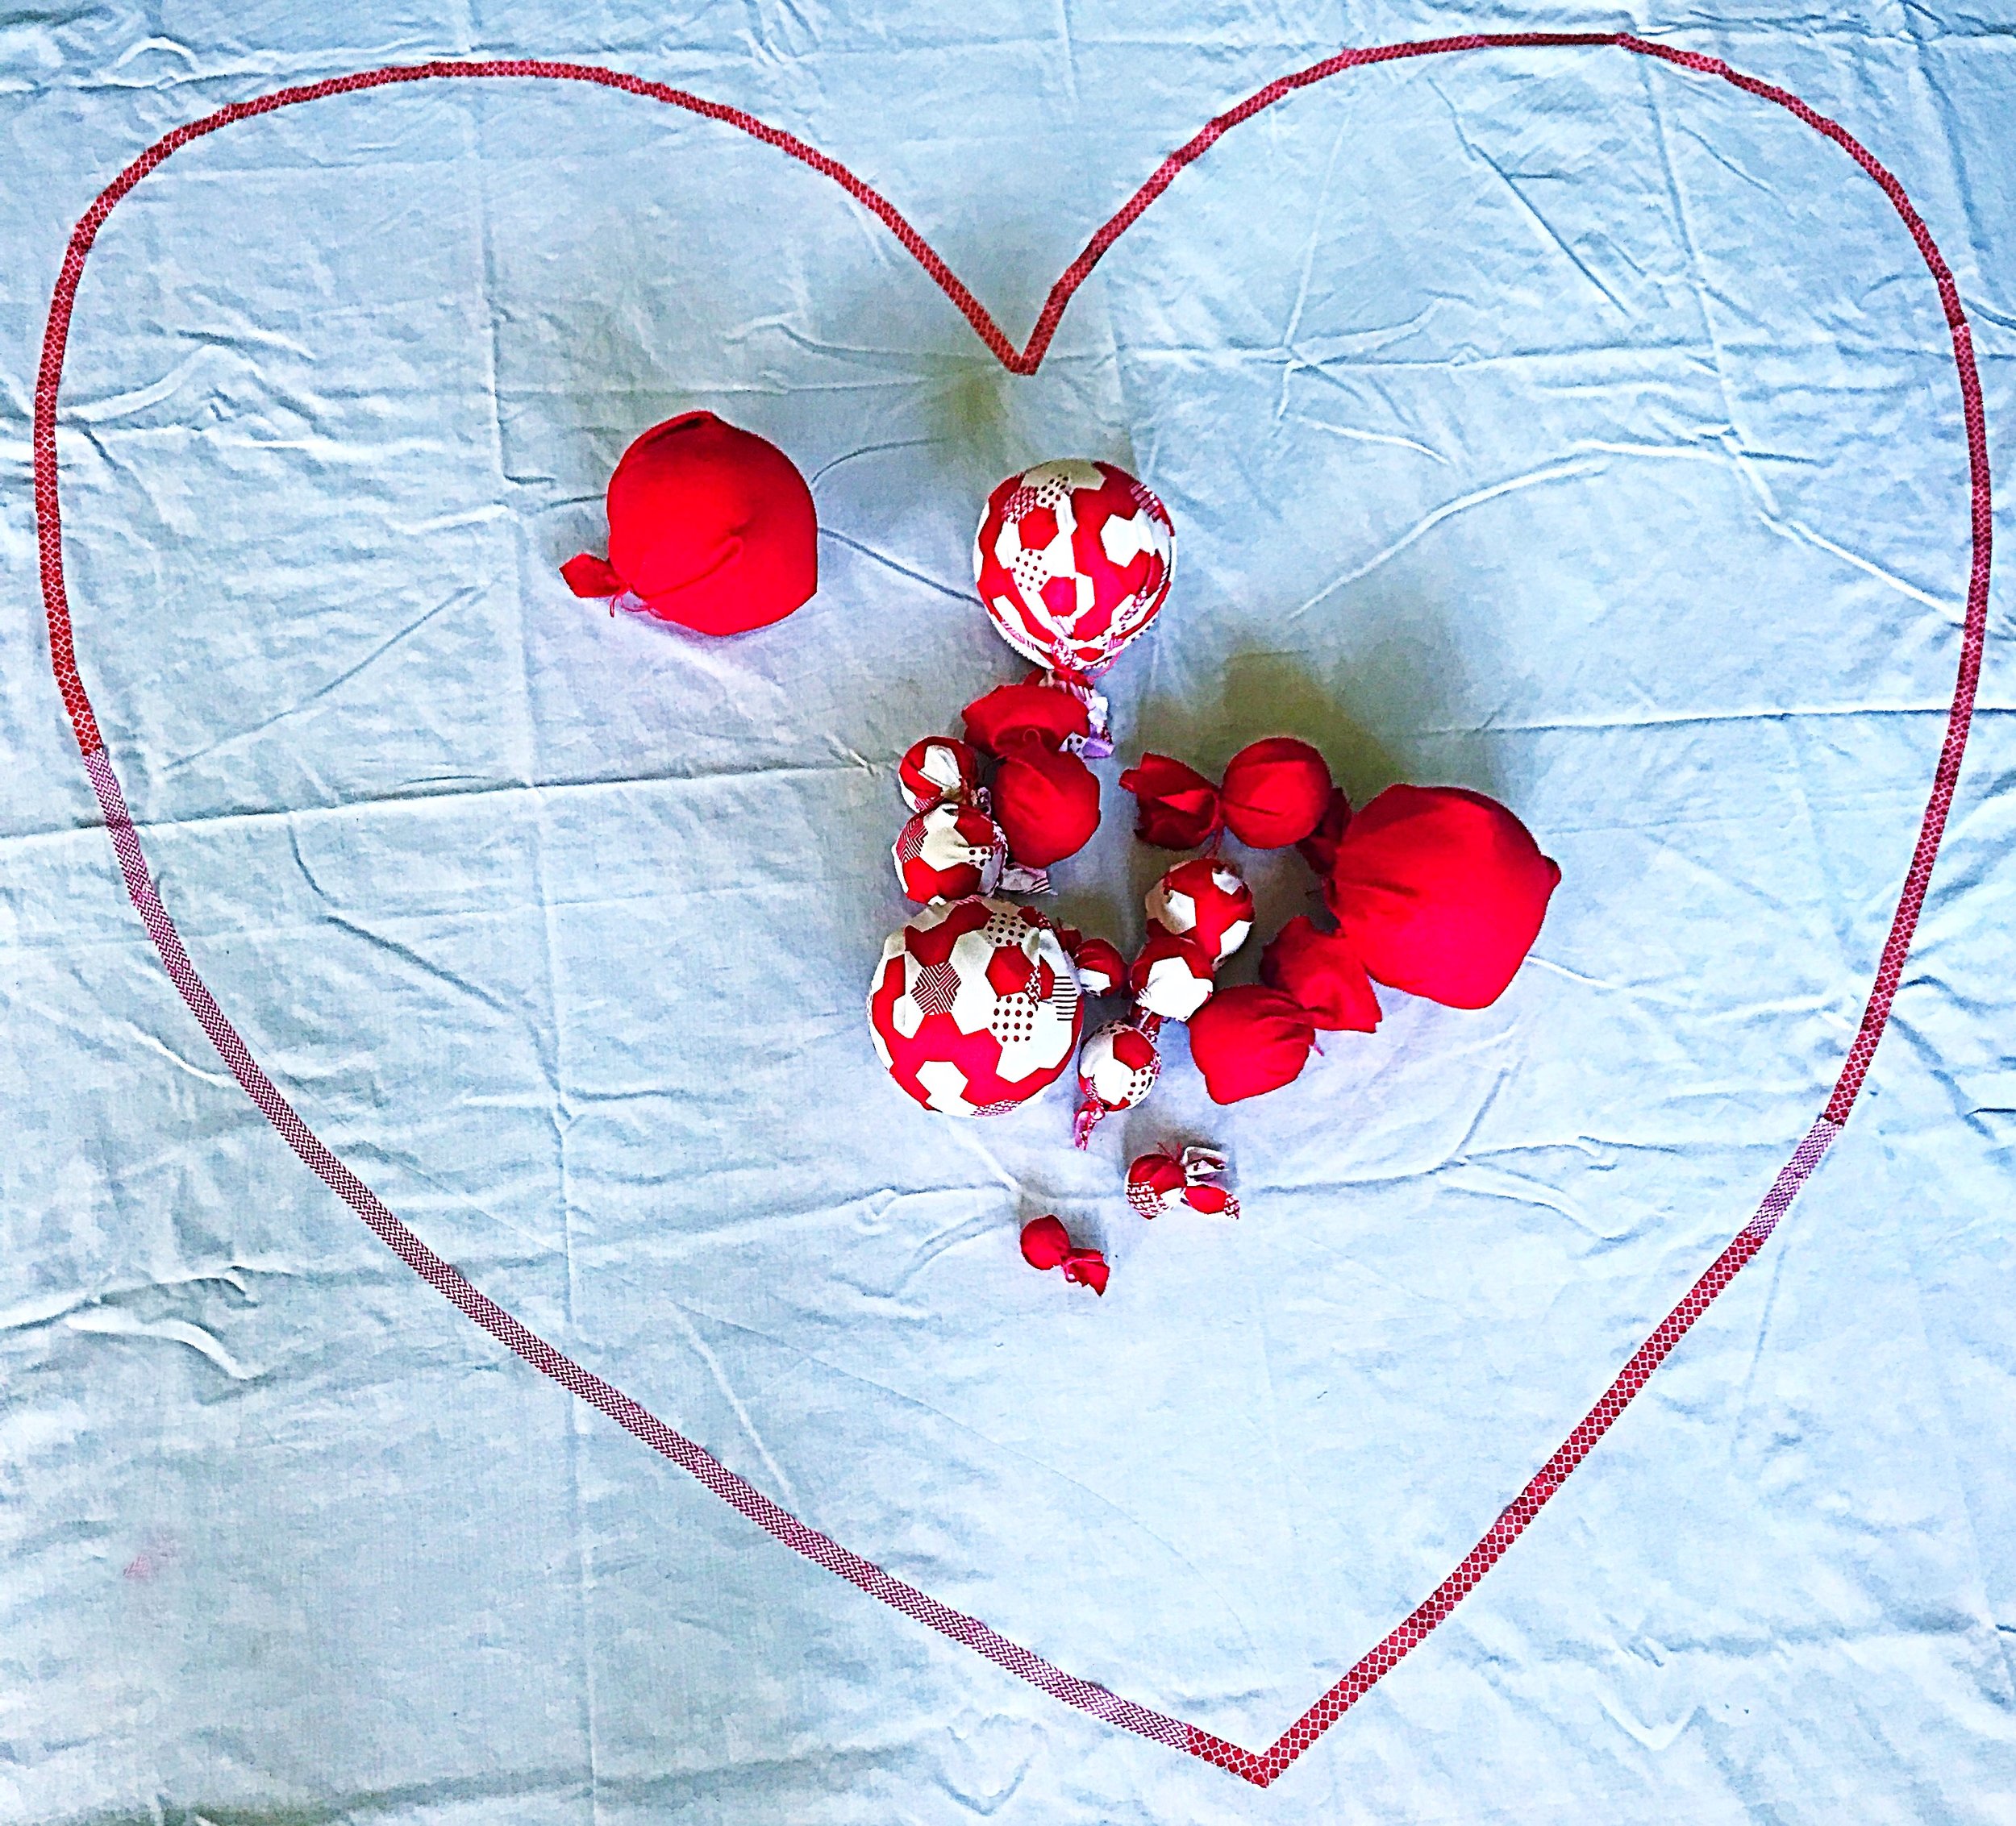
I often start with a white sheet on the floor as it gives me good contrast and clear perception of shapes and spaces. I wrapped paper and polystyrene balls in beautiful cotton linen. I varied the amount of fabric so the shapes represented both budding red roses and those in full bloom!

The small heart focal point … lush rich red wool.

Beginning to build the sculpture around the heart using lots and lots of floristry pins!

More building … the love is growing!! ❤️

So beautiful visually and texturally working with these stunning fabrics …
京都の金閣寺 Kyoto’s Kinkakuji Temple by Night!
One of our festive traditions is baking gingerbread … lots and lots of gingerbread! Every year for many many years since my children were babies, we’ve made (in addition to the wee houses and not so wee houses we make as gifts) a collaborative architectural construction of sorts! We’ve conquered different French Châteaux (that phase lasted for about 5 years), mystical, imagined castles and more recently even the Eiffel Tower (shot in the 1920’s at midnight at some moment in time!✨)!
Well, this year, as a nod to our love of all things Japanese, my children and I sculpted Kyoto’s Kinkakuji temple complete with edible gold lustre powder and sour cola strap roof shingles! (Photos in Portfolio).
We always have so much fun: we pour lemonade (and perhaps another kind of bubbles for me!🥂); play Christmas carols and simply lose ourselves in the other little world we’re creating!
We celebrated Christmas at home with our families this year and everyone enjoyed some gingerbread … even some mashed ‘cold rock’ style through vanilla ice cream!
This is one of the ways I like to make this time of year just a little bit magical ✨ and in the process, hopefully, also, make many special Christmas memories for my children. 🎄✨❤️
Illuminated sacred geometry
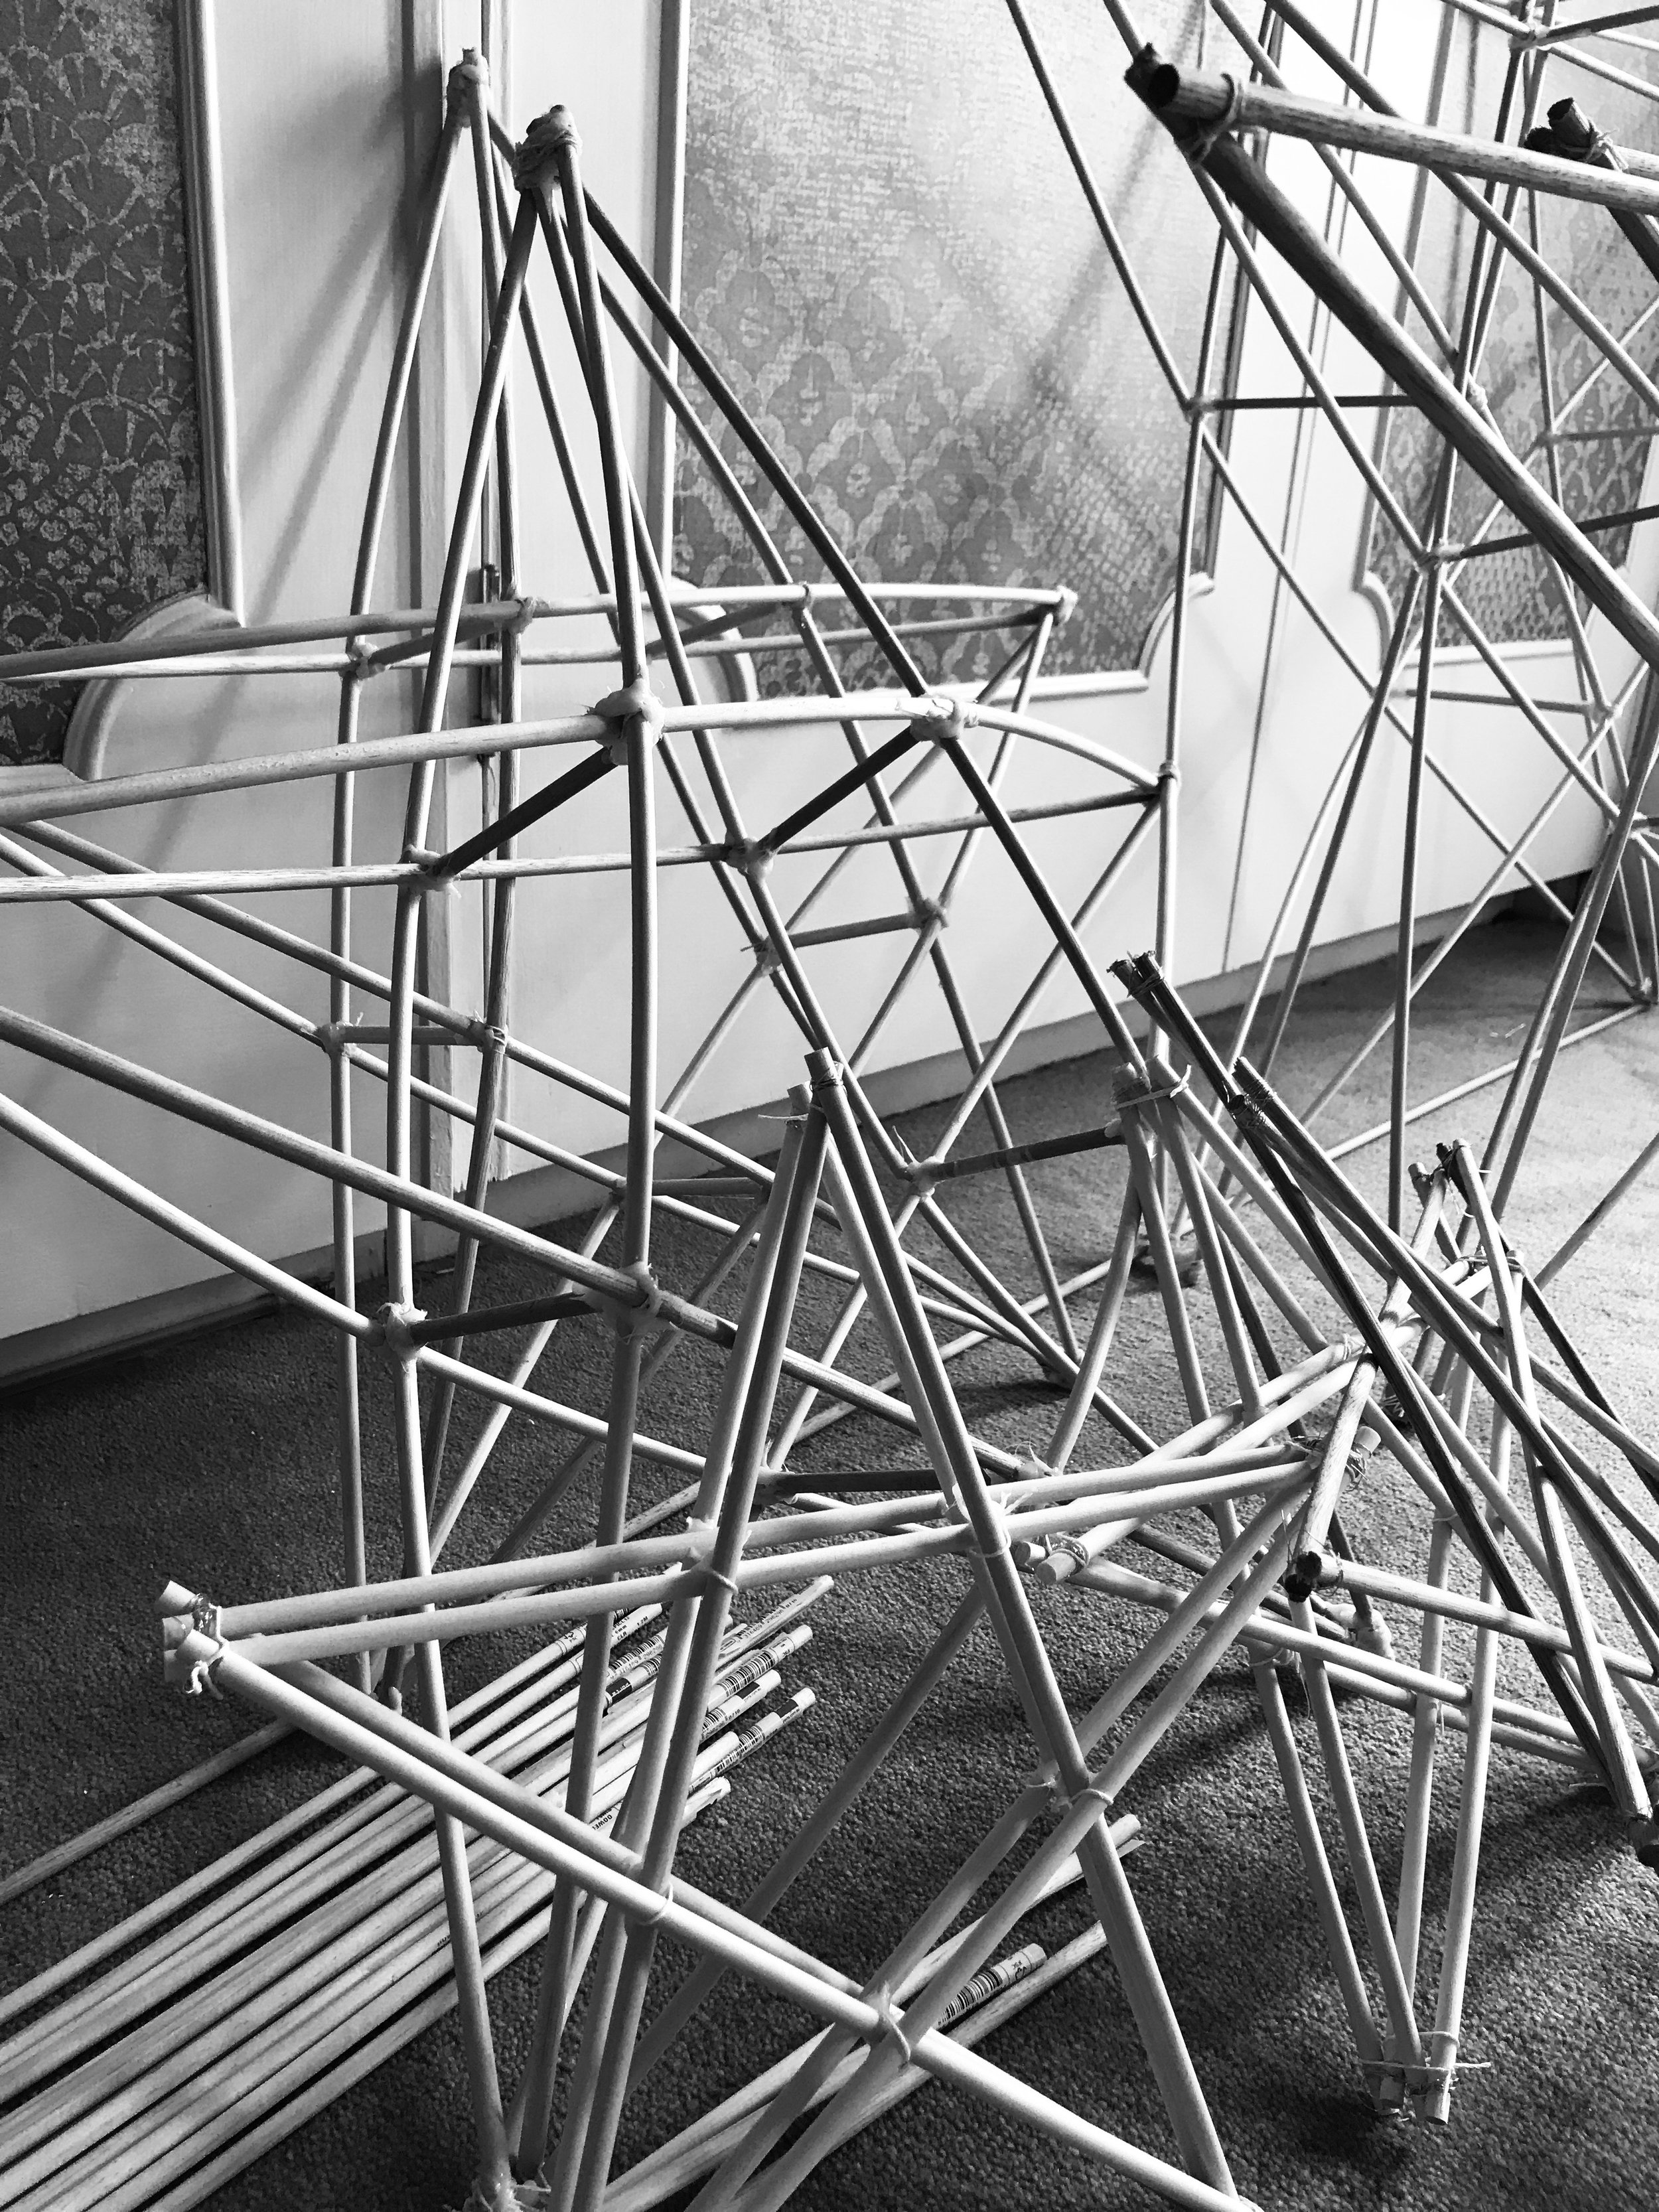
I adore himmeli … perhaps it is my Scandinavian ancestry … or my deep love of geometry … or my love of sculpture and simply making things … or a combination of all of those! To say I have been completely in my element is an understatement!
I have had boundless fun constructing several himmeli pieces: wreaths, a ‘sun’ and a ‘moon’ and a giant star to top my Christmas tree.
So ... a bit more about my beloved himmeli ... the making of them is a tradition in Scandinavia/Baltic Sea region. The etymology of the word is swedish/germanic ‘himmel’ meaning sky or heaven. Himmelis were made for Christmas, Easter, weddings, other celebrations as they were believed to be symbols of luck.
I used hollow ‘phragmites australis’ reed straws to make the wreaths, sun and moon shapes: the wreaths are repeating pentagonal prisms; the sun has at its core an icosahedron and then lots of triangles and then, the moon is made up of 12 pentagons ... based on a do ... do ... do ... do ... dodecahedron! The star is based on an octagonal prism. I finished these with beautiful LEDs, mini baubles and circular tinsel (my main wreath); teeny copper ‘warm’ lights (the sun and moon) and pastel LED lights (the star), respectively! Again, the reflections are so very special!
They are very festive but I have a feeling these sculptures will remain in situ forevermore!
They are very much, in so many ways, a Christmas present to ... me! ✨

The wreath base: the reeds are stitched together using thin cotton.

If you look carefully, you can even see the reflection of more of my Christmas lights in the centre (in the glass panels).

Illuminated ‘sun’ and ‘moon’.

My star.
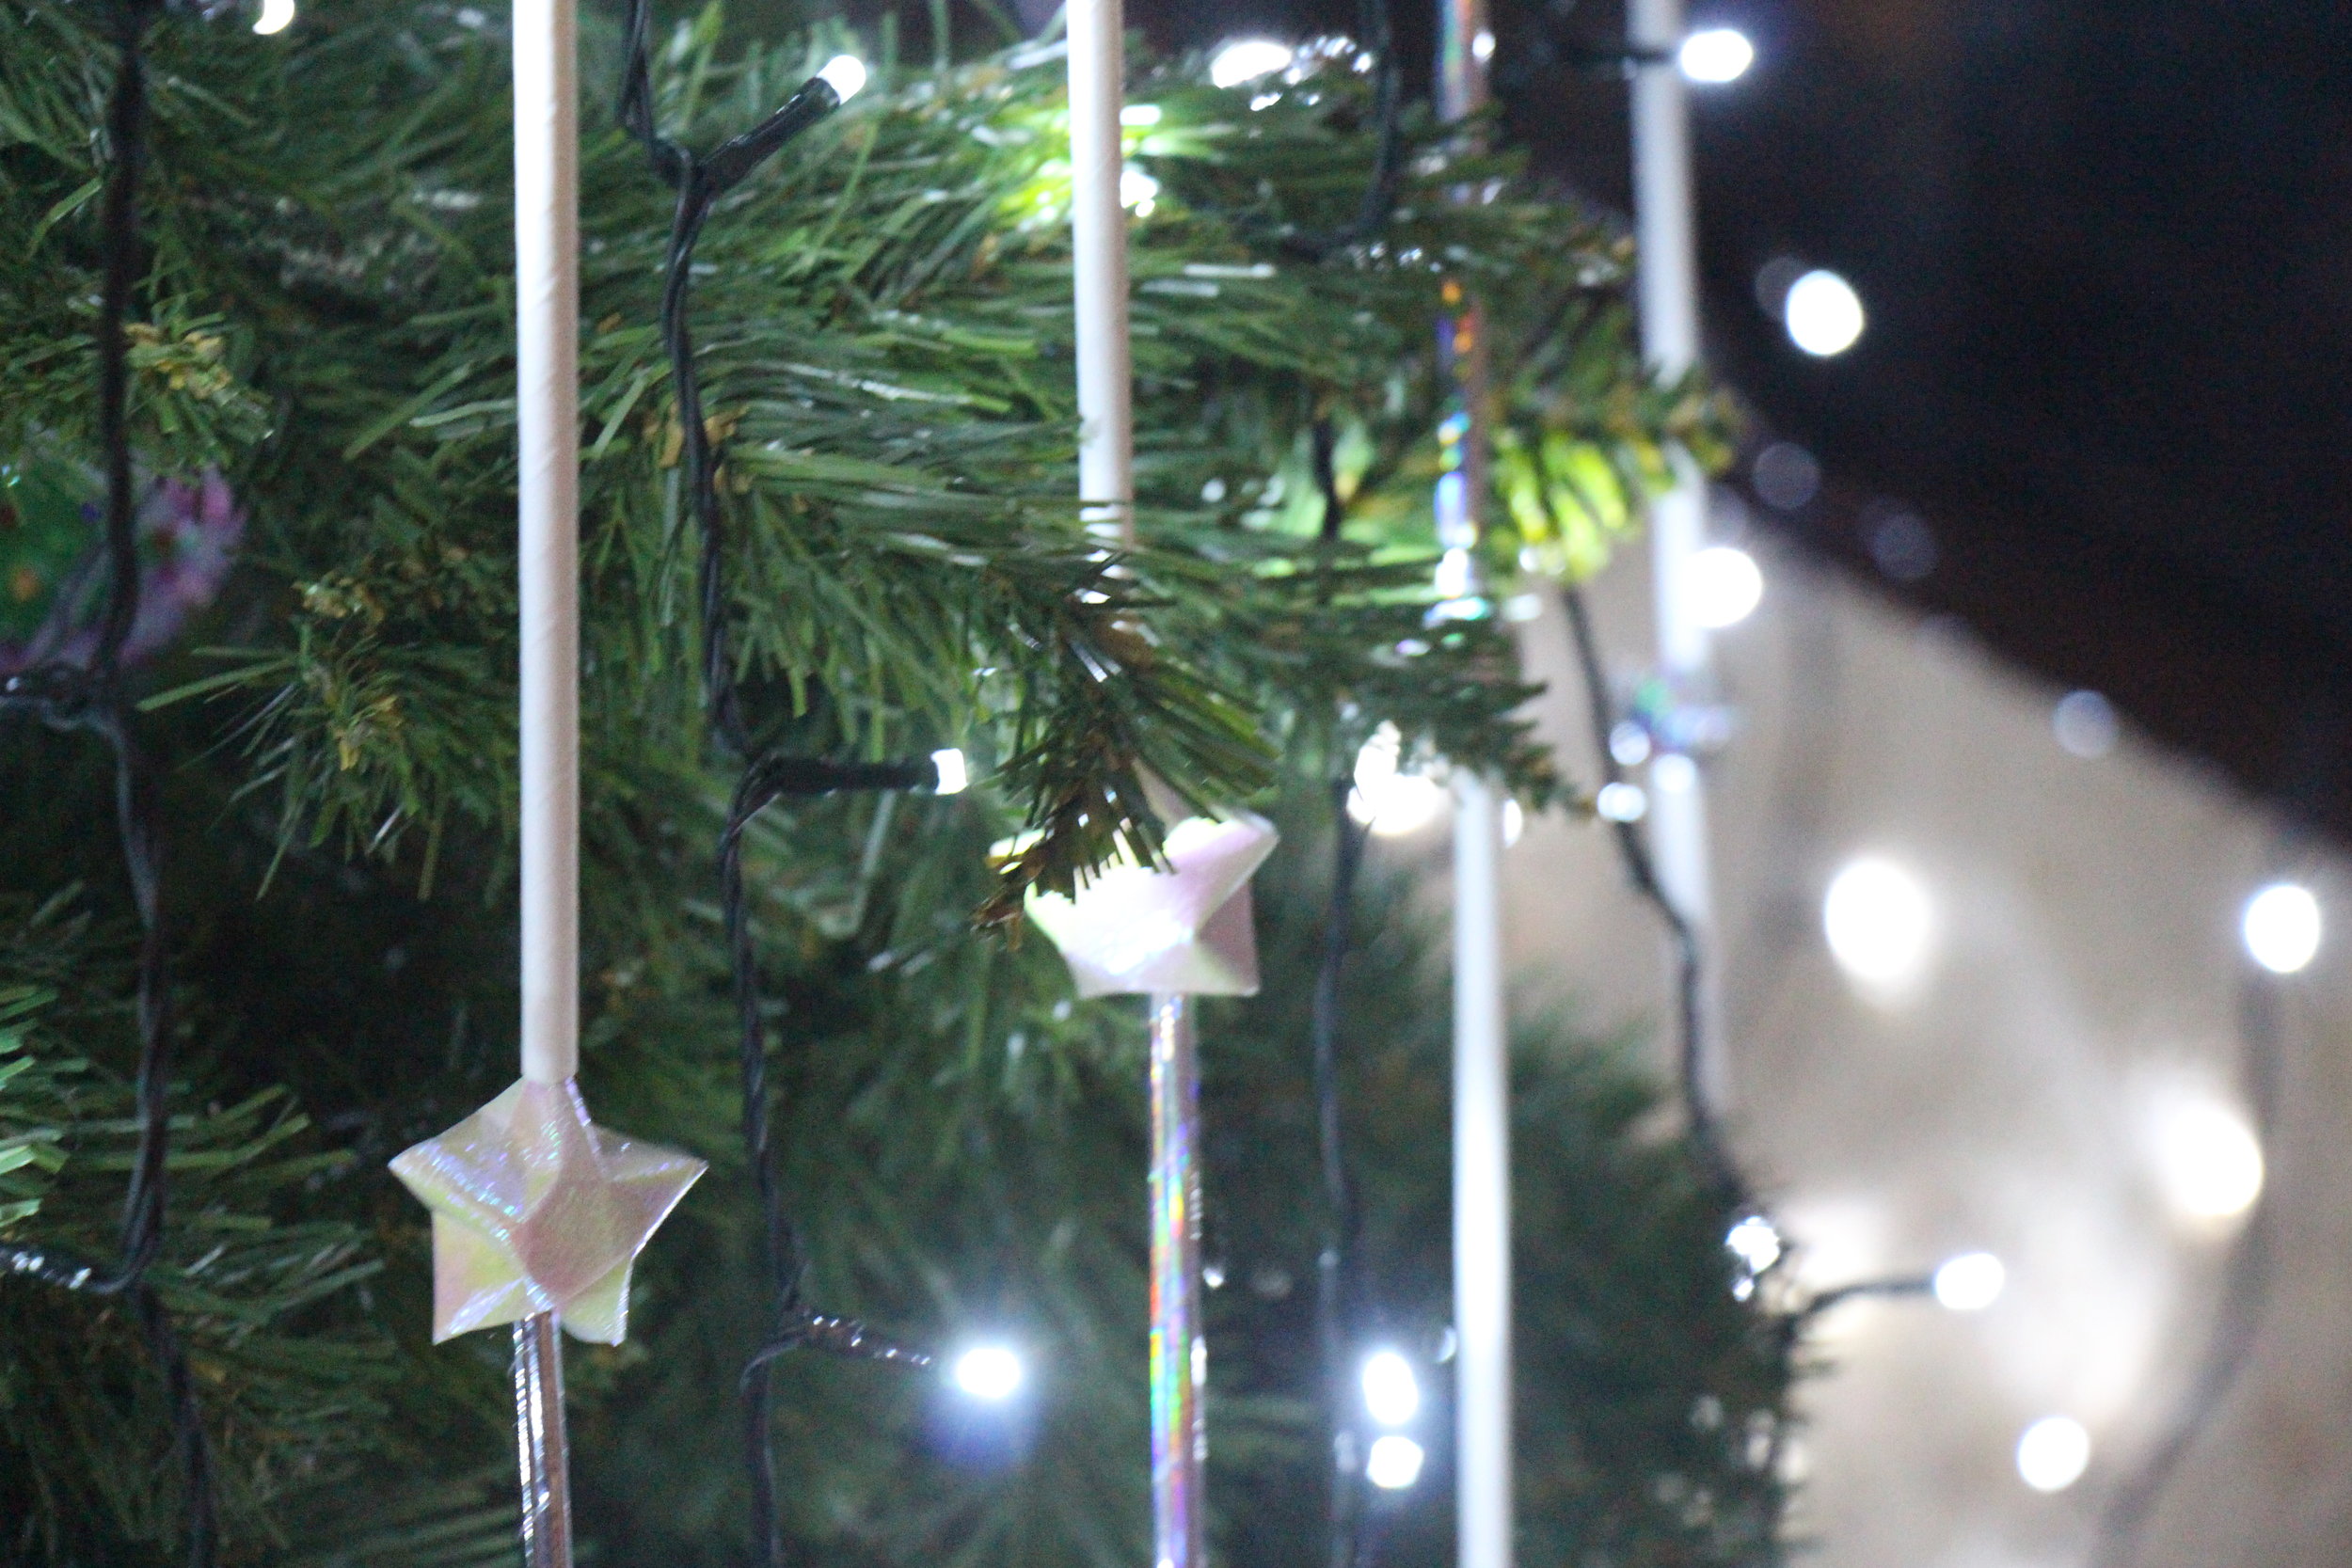
Himmeli origami fusion
I have loved experimenting with some of my favourite practices of late and combining my loves in himmeli and origami proved fruitful in my Christmas tree design for this year.
I used some paper straws (holographic, metallic silver and white) left over from my children’s birthday parties this year, together with little origami stars (also made from metallic silver and holographic papers) to construct striking festive garlands.
I then hung these garlands vertically, alternating with my rows of Christmas lights. The resulting effect is beautiful in its simplicity and pattern.

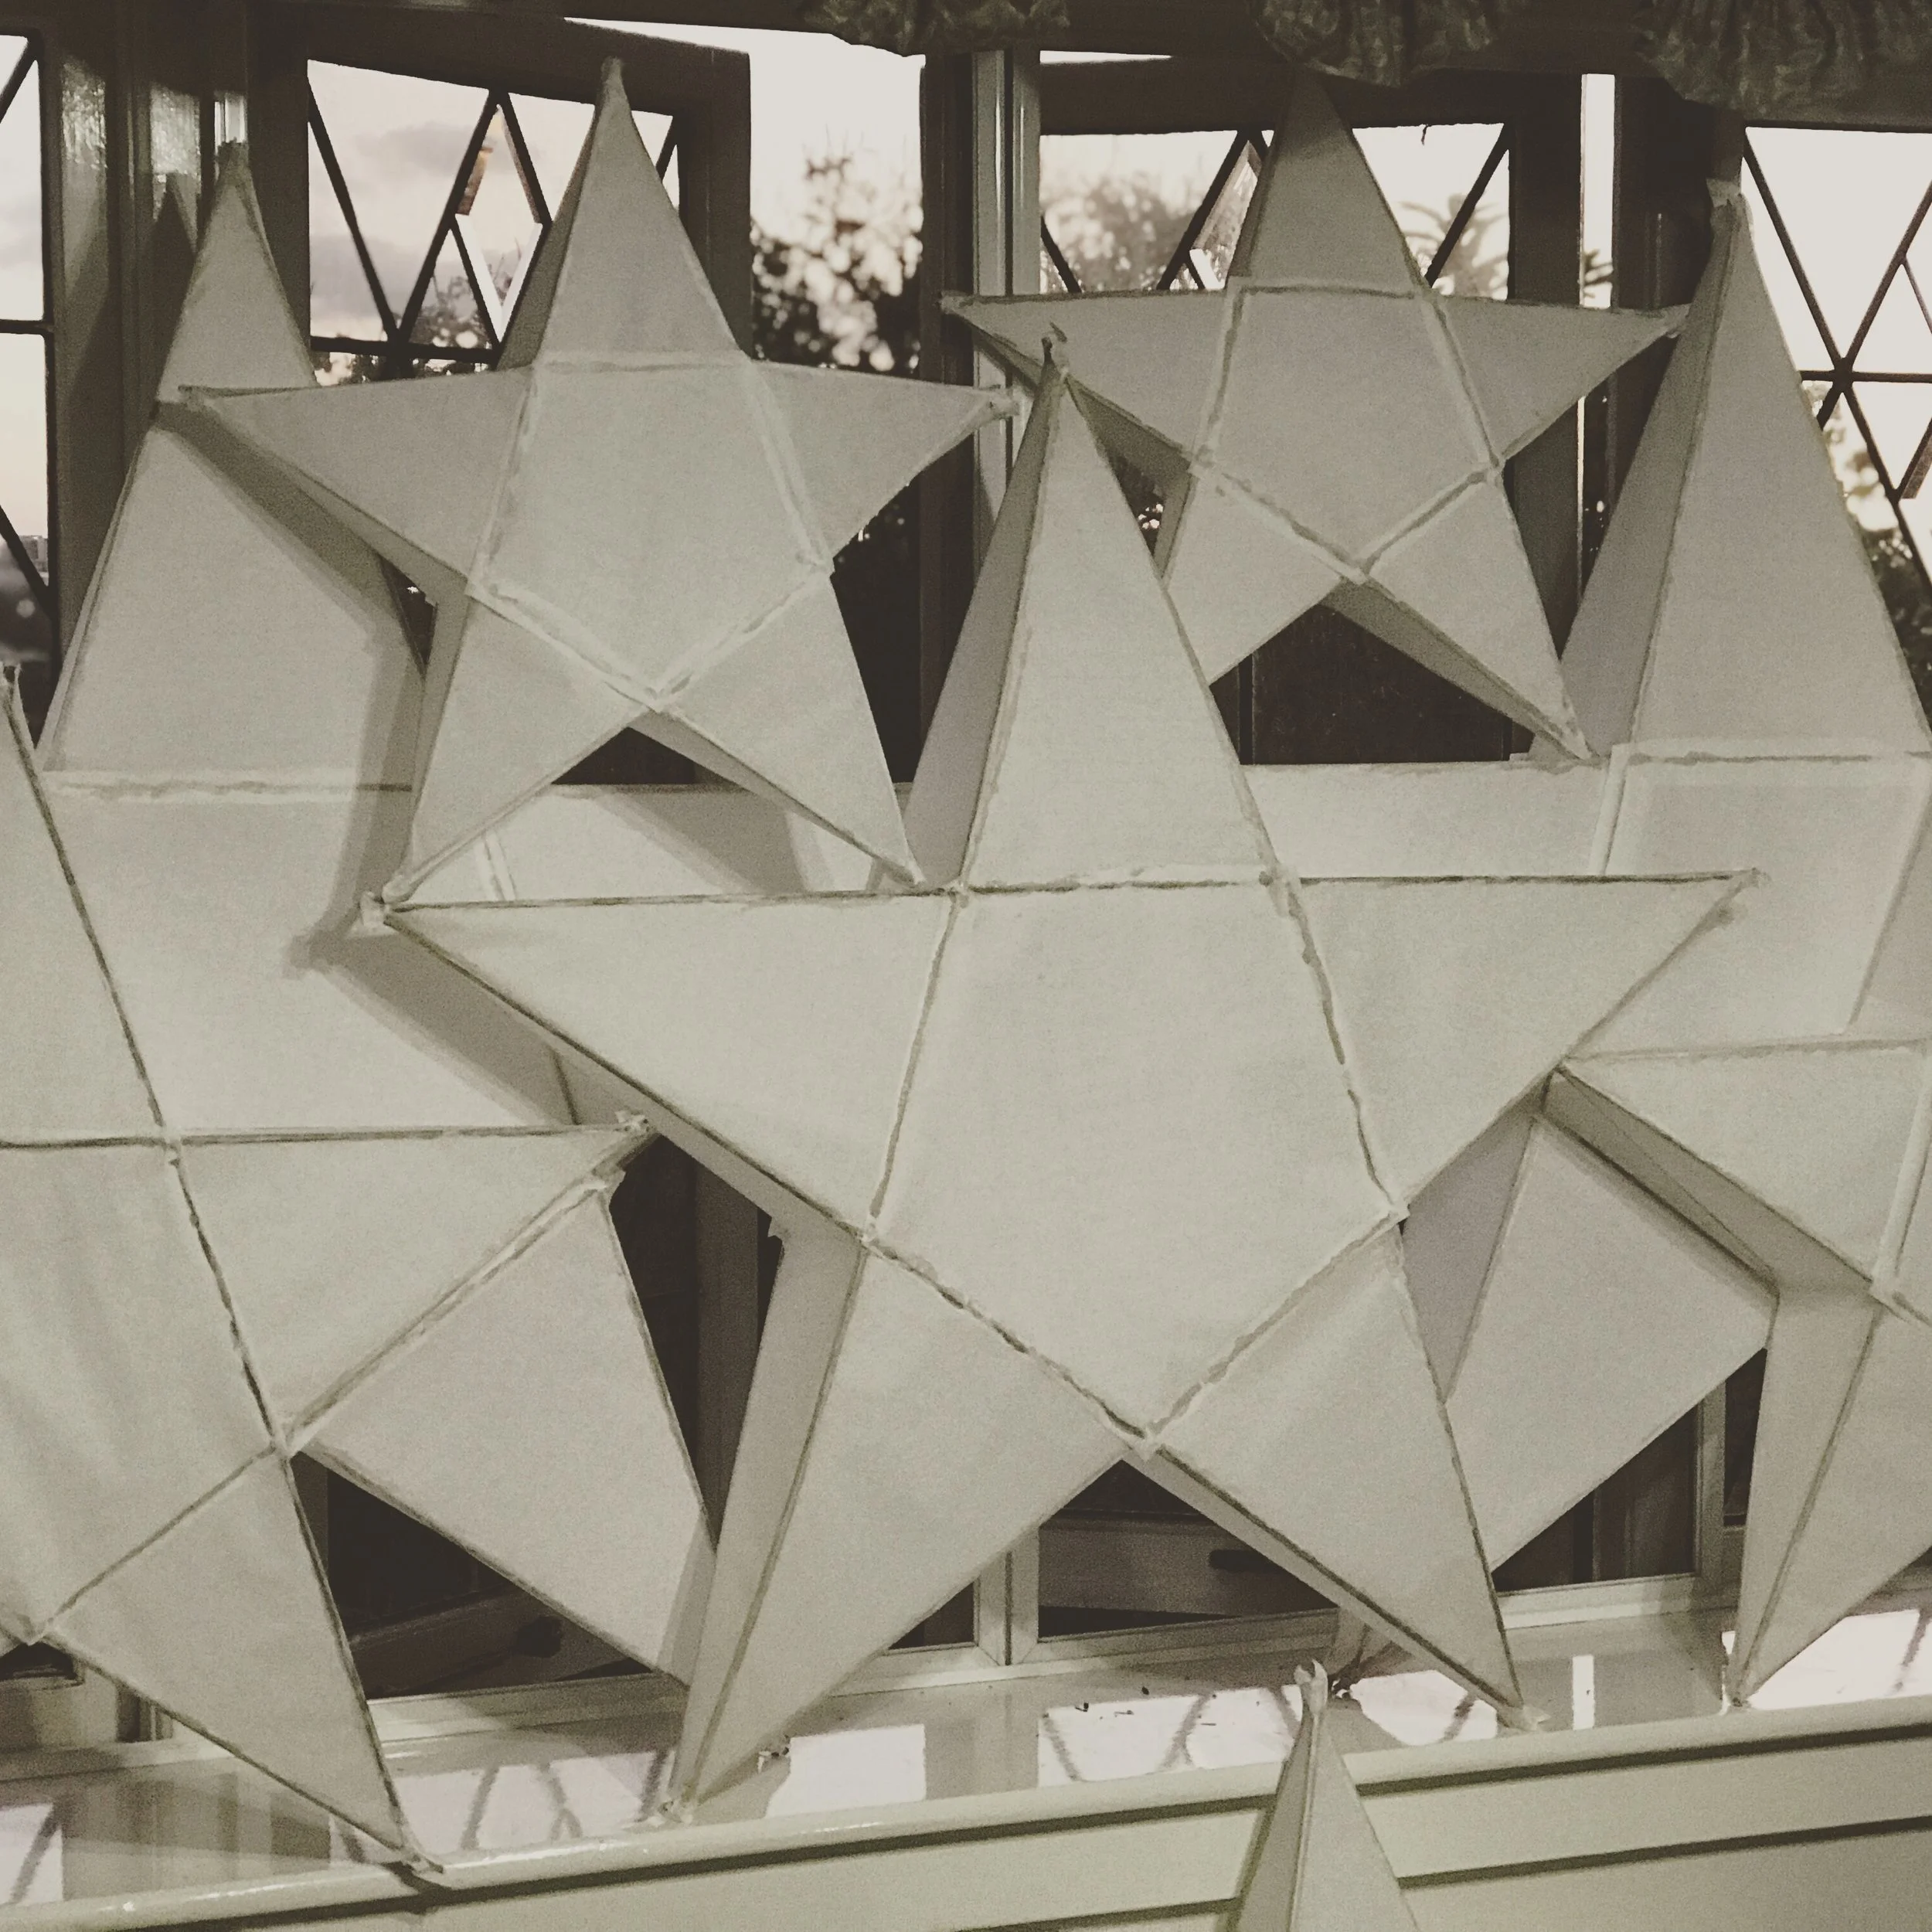
Stars are born ...
This past month I’ve been continually inspired by repeating patterns, geometry and once again, light!
It began in November with completion of my stellar construction for the wonderful team at Orb Hair at New Farm. I sculpted ‘parol’ (from the Phillipines) inspired stars using thin pine dowel, beautiful, light, translucent sumi-E calligraphy paper and silver nylon thread. I also incorporated delicate silver star tinsel and other accents using the same pine dowel but spray painted white and bound together in the shape of a star using jewellery wire. The resulting effect in Orb’s 5 windows has been very striking and festive!
Here is a visual diary of my process.
The initial pine dowel parol star structures constructed using jewellery wire and string.

Affixing the sumi-E paper. This translucent paper is beautiful in the light of the windows. The resulting pieces almost appear luminous.

Affixing the remaining pieces of sumi-E.

The stars are all covered here and ready for final detailing in my stitching with silver nylon thread.


I loved this process of stitching the sumi-E paper to the pine framework. It was very meditative. I used curved/hook needles to stitch the central portions of the stars.

I then completed the pine dowel pentagonal stars and spray-painted them white.
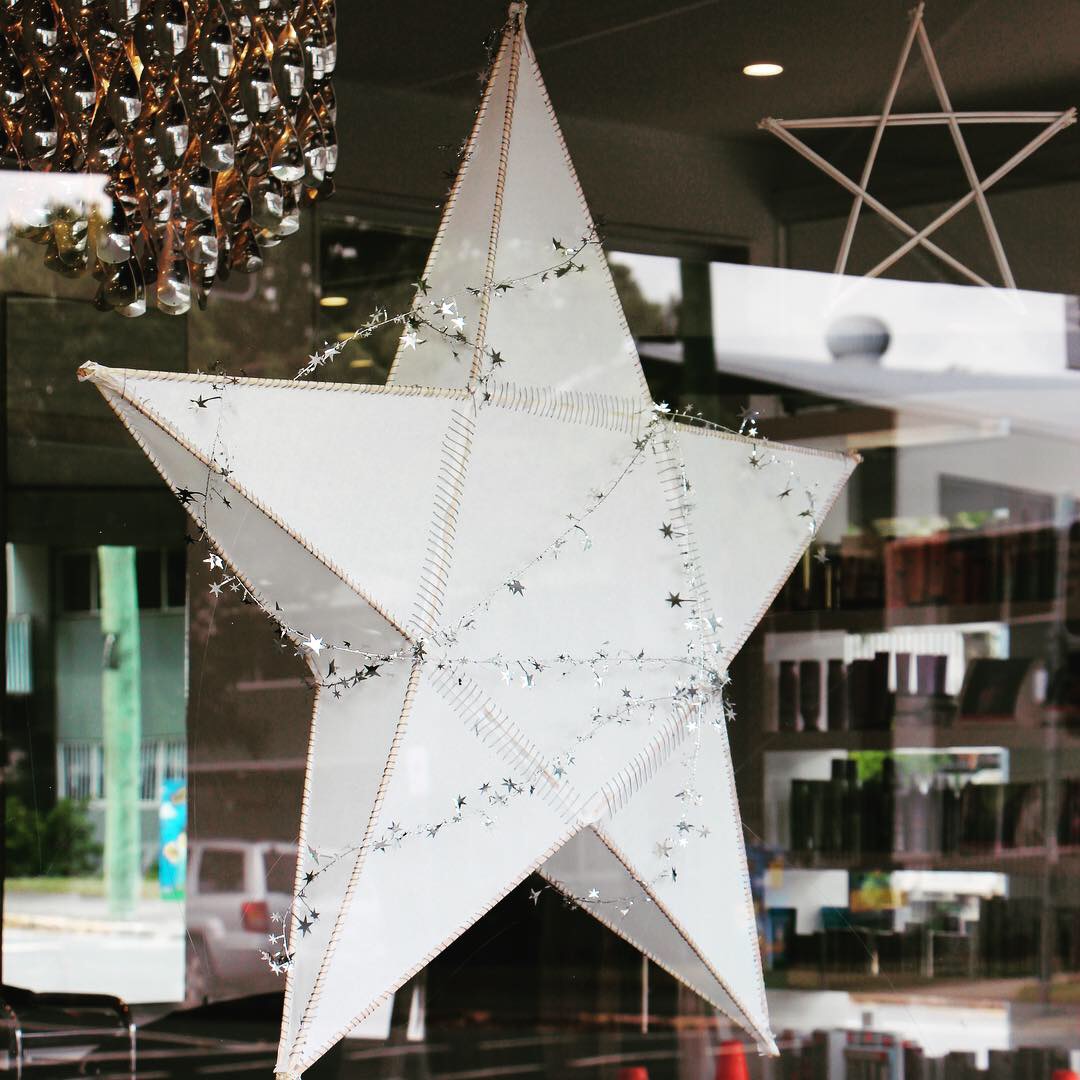
The final step was to transport (carefully as the paper is very very delicate) the stars to Orb, adorn them with the beautiful tinsel and then hang them sequentially in the windows. I am so so happy with them!

tsuru synchronicities
‘Whether we name divine presence synchronicity, serendipity or graced moment matters little. What matters is the reality that our hearts have been understood. Nothing is as real as a healthy dose of magic which restores our spirits’. Long
I have been quite taken aback, recently, and have had my ‘spirits restored’ by the number of synchronistic moments I’ve observed. The most recent (another before this involved the Big Sur, Jack Kerouac and Jack Johnson!) … involved me observing cranes - paper origami cranes - literally on my path - amidst what have been somewhat challenging times for me of late. I took photographs of 3 of these cranes I came across on different concrete pathways within several days, as I walked in different places around my city. The paper origami crane has been a very special personal symbol of hope and peace for me for a few years and so to see them appearing physically before me, randomly, when I needed them the most, was as eerie as it was very comforting. Stumbling across these different paper cranes when I did, felt like a reassuring ‘wink’ from the universe! ✨


Handmade paper
I have thoroughly enjoyed making this beautiful batch of handmade papers recently. The ultimate colour and textures are simply beautiful. I mix the recycled paper pulp with water in my laundry sink and then use different sized molds and deckles to create the sheets. I dry the papers on a sheet of glass in the sun or on the glass of my shower.
The papers incorporate a variety of different additions: leaf skeletons, confetti, rice paper insets of hearts, stars, dragonflies and doves and torn pieces of Japanese or French texts.
They will feature in my Etsy shop very soon ... once pressed, folded and packaged!

Watercolour invitations ...
My daughter Clementine and I collaborated to make some beautiful invitations for her recent 12th birthday garden party. Clementine painted the background in watercolours and I scribed the important details in indian ink. They turned out beautifully - a very fulfilling project for both of us! Generic invitations coming to my Etsy shop soon ... watch this space!

Handmade ... sneak peek!
Here is a little sneak peek at some of the beautiful handmade stationery treasures I've been busy making for the relaunch of my Etsy shop later this month.
The new goodies feature hand-scribed (in luscious indian ink) and hand-embroidered cards, origami gift cards and gift tags and origami decorations. I have used recycled and upcycled materials where possible (including many lovely hand-cut pages from matte magazines such as Frankie and also, pages from old Japanese, French, Norwegian, poetry and maths texts and unique chiyogami papers) and have also incorporated natural features such a stunning wooden beads, wooden (balsa) gift tags, handmade paper beads, jute string and feathers. As always, I've been inspired by nature and my love of languages and cultures, literature, poetry, philosophy and film. I am reading much about Japanese philosophy at the moment and this has influenced a collection of wabi sabi and kintsugi cards and origami notelets inspired by 'the red string of fate' ... amongst other mirabilia.
I've also started making some beautiful handmade papers. I love the process of sourcing the paper (such as my children's school notes, newsletters, office remnants, magazine scraps (from my origami paper cutting!) etc), shredding, soaking and then blending the pulp before using my deckle to create the new delicate paper forms. I love incorporating hand-cut rice paper features (e.g. hearts and dove shapes) and or natural elements such as seeds and leaf skeletons!
Holidays are just around the corner for me but rest assured, I'll be 'making' whilst travelling and will come back rejuvenated, energised and even more creatively inspired. There's nothing like a holiday amidst the beauty of the natural world ... all of its simplicity, colour, sounds, textures and patterns ... to get the creative juices flowing!
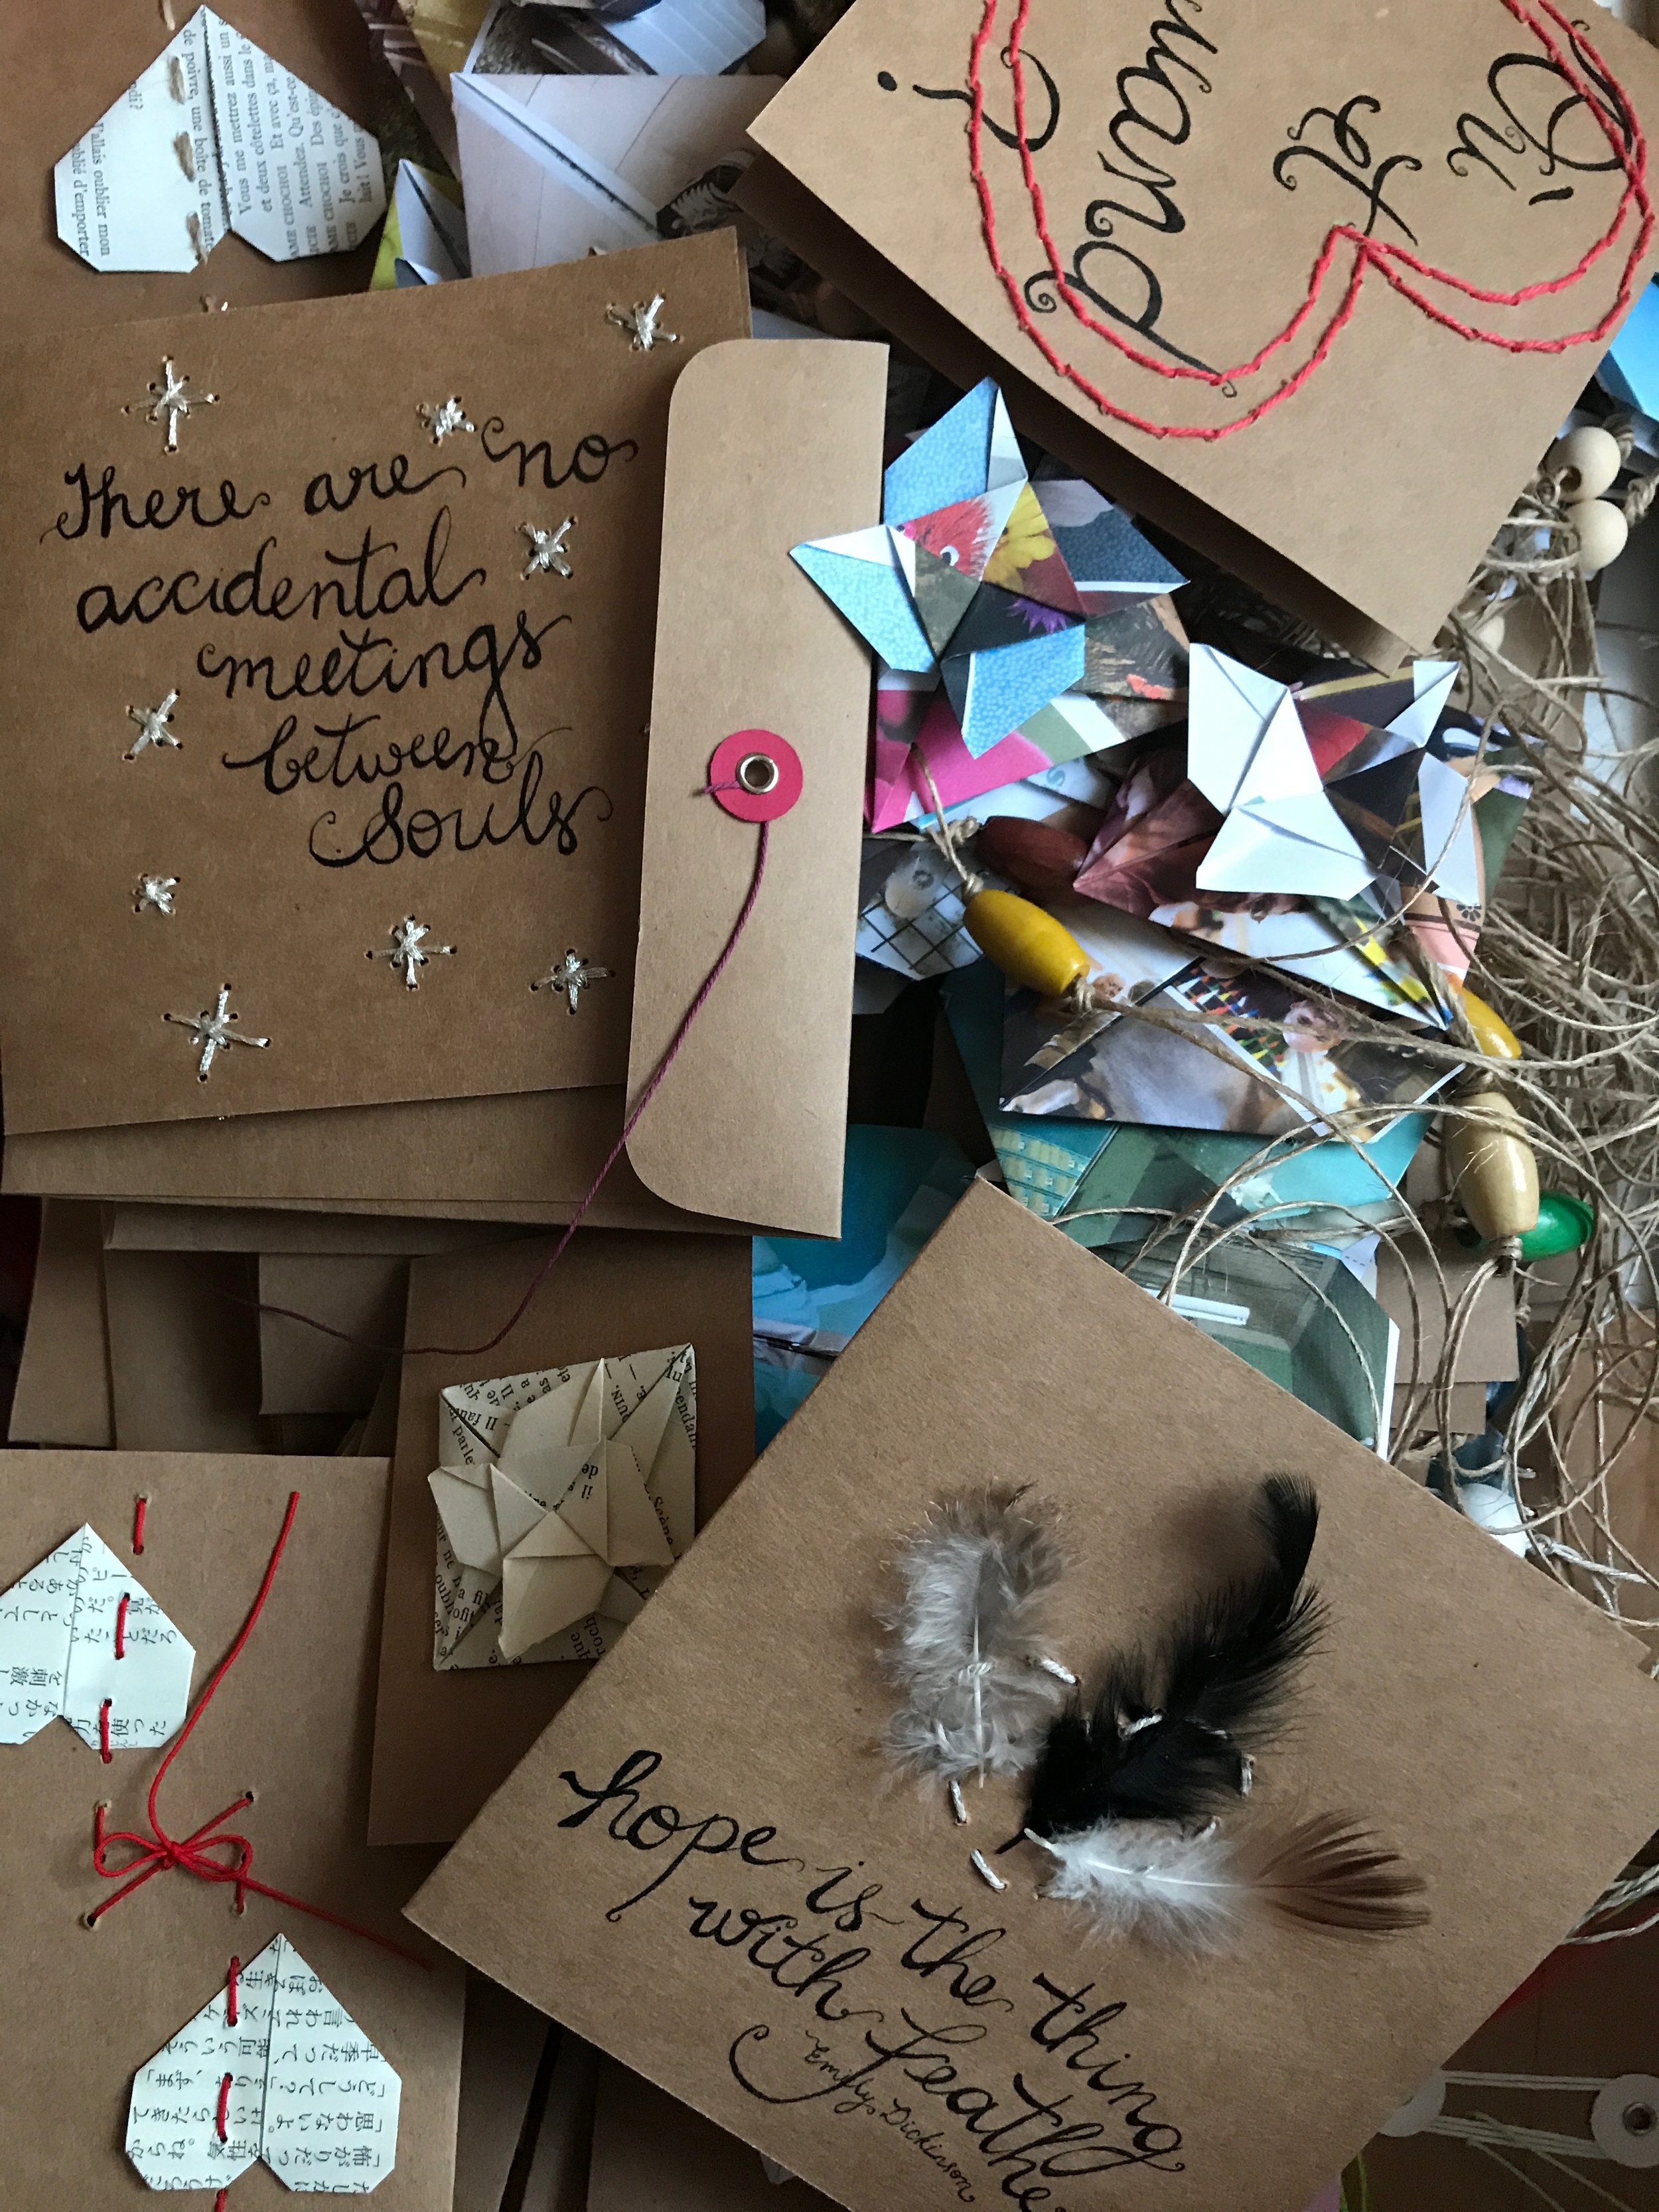
Some of my new hand-lettered and embroidered card and decoration stock.

Beautiful gift cards incorporating origami elements and natural and upcycled materials.

Here is my stockpile of shredded, recycled papers ready for soaking. The ultimate paper should be a spearmint green colour as there were a few green recyclables in this lot!
Vibrant box frames ...
I've enjoyed a very productive week ... finally getting around to some serious 'spring' cleaning at home and finishing several projects which have been on the back-burner for far too long!
Out of the thousands of origami paper cranes we amassed during the Peace Crane Project in 2014, some 'returned' to Hiroshima; a few senbazuru are now calling Queensland Museum home (exhibition opening soon ... ) and with the remainder, this week I've made these brilliant keepsake box frames to showcase the residual cranes at home. The Peace Crane Project was profoundly meaningful to me and I am grateful I have this selection of cranes to remind me of the experience and all it taught me.
I've also finally finished a box frame of my collation of origami 'presents' and am very pleased with the result. I used beautiful French origami papers (the stunning patterns were designed by a collective of French artists).
I am thinking of making both concepts a feature in my Etsy shop (reopening later this month)!

Can you spot the mini ... really mini ... cranes???


With this origami fold, you can pull the top of the present like a 'bow' to reveal a secret message written inside! These ones aren't for 'pulling' though ... they are to remain in tact - preserved for their patterned beauty beneath glass!
Beautiful handmade goodies on their way!
I'm very excited to announce I will be re-opening (after a brief but creatively inspiring, hiatus) my online handmade store on Etsy this July!
Keep an eye on this site for the re-appearance of my 'handmade' link in the header ... it will direct you straight to my shop! Or, alternatively, you can visit www.karalynshaw.etsy.com. You'll only have to wait a wee bit longer, now for the launch of my new lovelies!
I've been busy making a variety of beautiful papers, cards, (and origami adorned versions of same) invitations, decorations, garlands and simple origami pieces for my virtual shelves ...
So, watch this space ... and look forward to the arrival of my delicate and delightful new stock!
A trove of varied pink ribbons ...
I relished my latest installation. I can't decide whether I enjoyed scouring Bunnings for the most appropriate base materials or, sourcing, cutting and pinning an innumerable number of beautiful, different toned and textured, pink ribbons, the most!
All in all, I loved every second of sculpting this huge breast cancer awareness ribbon for Orb Hair and Beauty's window on the corner of James St and Merthyr Rd, New Farm.
Orb Hair and Beauty are supporting Breast Cancer Awareness Month this July and this is an eye-catching statement piece to help promote the cause.
I sculpted the large 'ribbon' shape using brilliant metallic silver lengths of air-conditioning duct tubing. I sealed sections of the tubing together using superglue and jewellery clamps and also stitched certain joins (which ultimately would support the most weight) using 20lb fishing line.
Even though all of the individual elements were quite light in weight, the weight of the resultant work was significant and a challenge to hang but I got there and couldn't be happier with the glimmering result! I was thrilled to receive compliments from guests and passers-by too as I hung the work.
I am very grateful to Deb and her team at Orb for enabling to share my creativity with them all once again!

The stunning metallic silver air-conditioning duct tubes I used as the base.

I sourced a beautiful selection of different pink coloured and textured ribbons to create the larger 'ribbon'.

I pinned ribbons all over both sides of the tubing, taking care to balance sizes, tones and textures. I used hot glue to seal the pins in place so the weight of them wouldn't cause them to fall out. I depressed, slightly, the middle point where the tubes overlap so this section wouldn't be too bulky and potentially press-up against the window pane.

A close up of a section of tubing with pinned ribbons.

A big beautiful, sparkling ribbon in support of Breast Cancer Awareness Month!
Tulip Fever!
I am blushing with happiness and satisfaction in the reflected glow of the striking pink field of tulips I created for Deb and all her team at Orb Hair and Beauty, New Farm, for Mother's Day this year.
In terms of colour brilliance, patterns and balance of tones and shapes in the space, I could not be more thrilled with the outcome and feel this is one of my best works yet!
It was quite challenging threading the tulips and allowing for and hanging the 3D papier-mâché letters amongst them but hard work and once again, attention to detail paid off and the end result is very striking and hopefully, eye-catching for all passers-by of Orb!
Here are a few snapshots of the work in progress:

The work began with selecting appropriate papers and colour tones and of course, with a lot of folding! The tulip is not a complex fold by any stretch but I wanted to work with 125gsm card to make the installation quite robust and this was more tough on my hands than usual.

Once I had folded the separate bulb and stem elements, I created the tulip by inserting the stems into the bulbs. For extra strength, I used my hot glue gun to seal the join.

I measured out the window drop and arranged the tulips on a white sheet so I could get a good sense of the shapes in space. I then affixed small cardboard discs to the base of each tulip, in the same colour as the stems and threaded small green buttons below each tulip too, to allow them to sit flat and be strung in a line. I then secured each tulip using a tiny jewellery clamp.

The tulip base with the disc and small button.
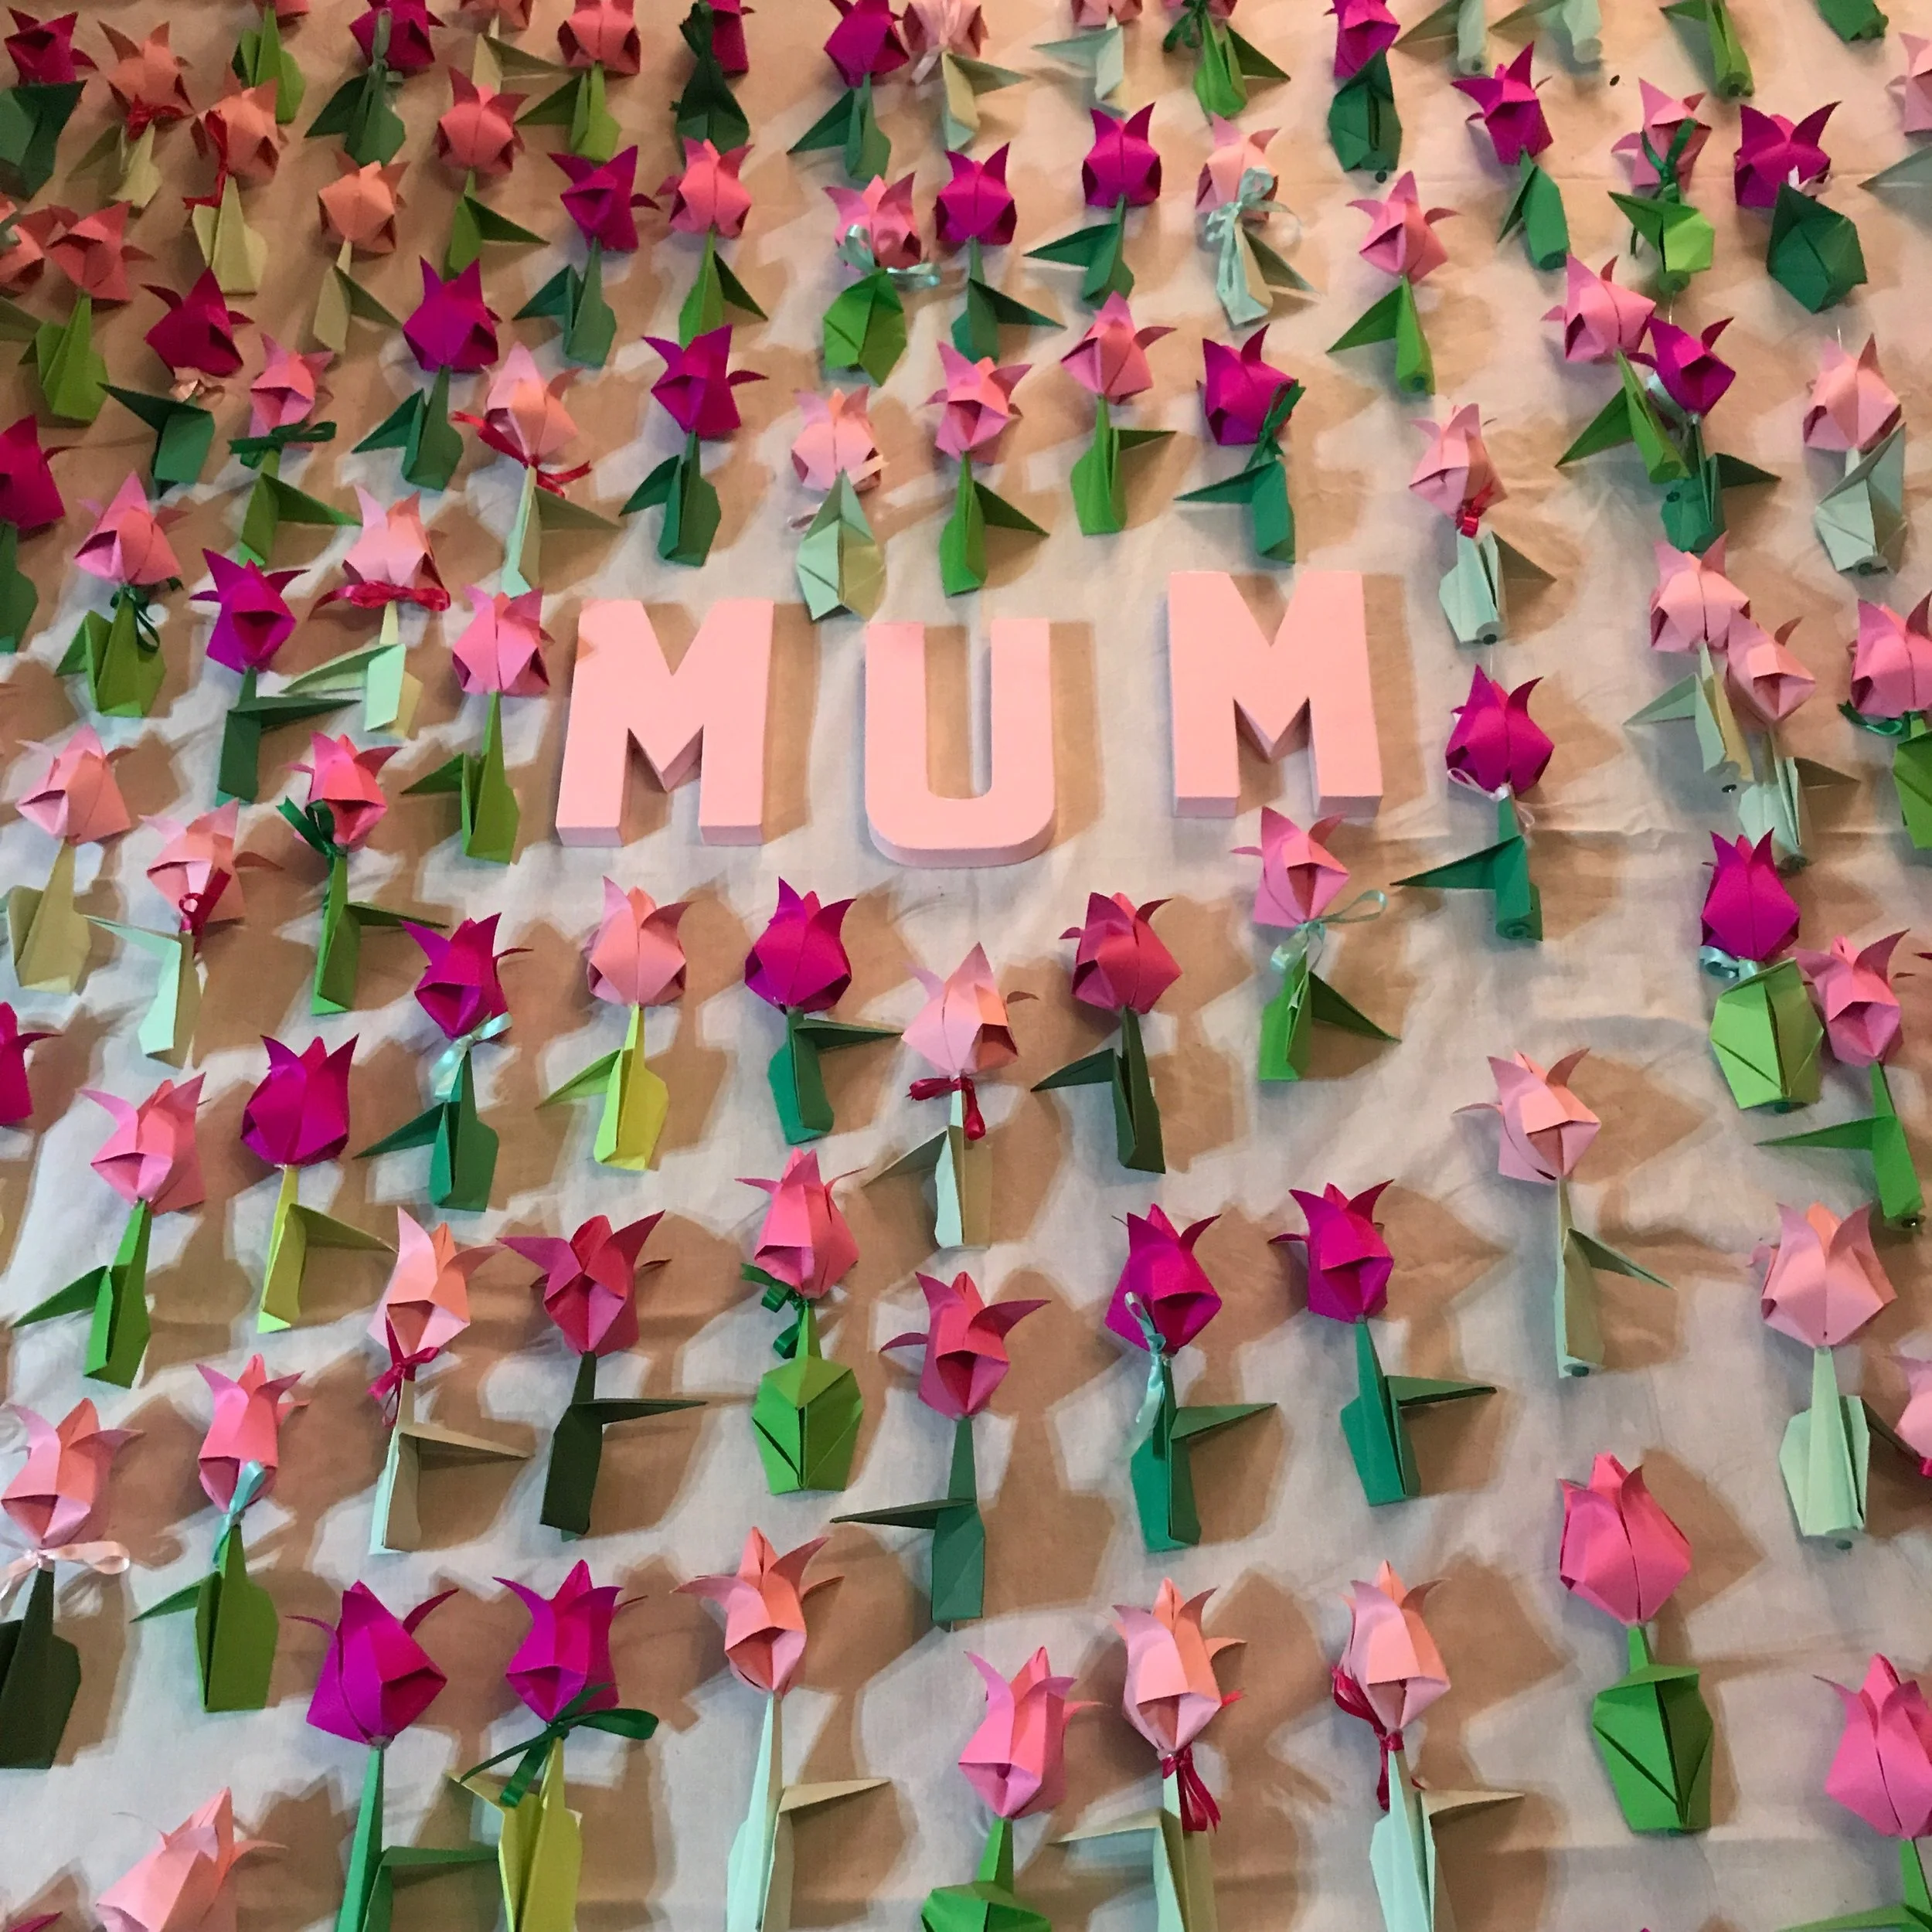
Ultimately, I spray-painted the papier-mâché 'MUM' letters. I used a rust-primer as it was the only spray paint I could track down in the shade I wanted!
I also finished tying some satin ribbons in matching shades of pinks and greens to some of the tulips to represent gift-giving on Mother's Day, too.
I thoroughly enjoyed working on this commission and was really excited to see it blossom in the window at Orb!
Delicate hand-sculpted Peonies and Japanese Anemones
I have enjoyed very much sculpting these beautiful delicate flowers of late. I hand-dyed crêpe paper in different food dyes to achieve natural, variegated petals. I love the texture of the crêpe paper. It's beautiful to stretch and shape using different materials. The small, fine, inner petals of the peonies are all single layers of paper but the outer petals and those of the anemone are larger, thicker and multi-layered (and in some instances, multi-coloured). This is an art form I would very much like to improve upon. I am forever in awe of mother nature but perhaps a little bit more so after attempting to imitate her creative prowess in this way!

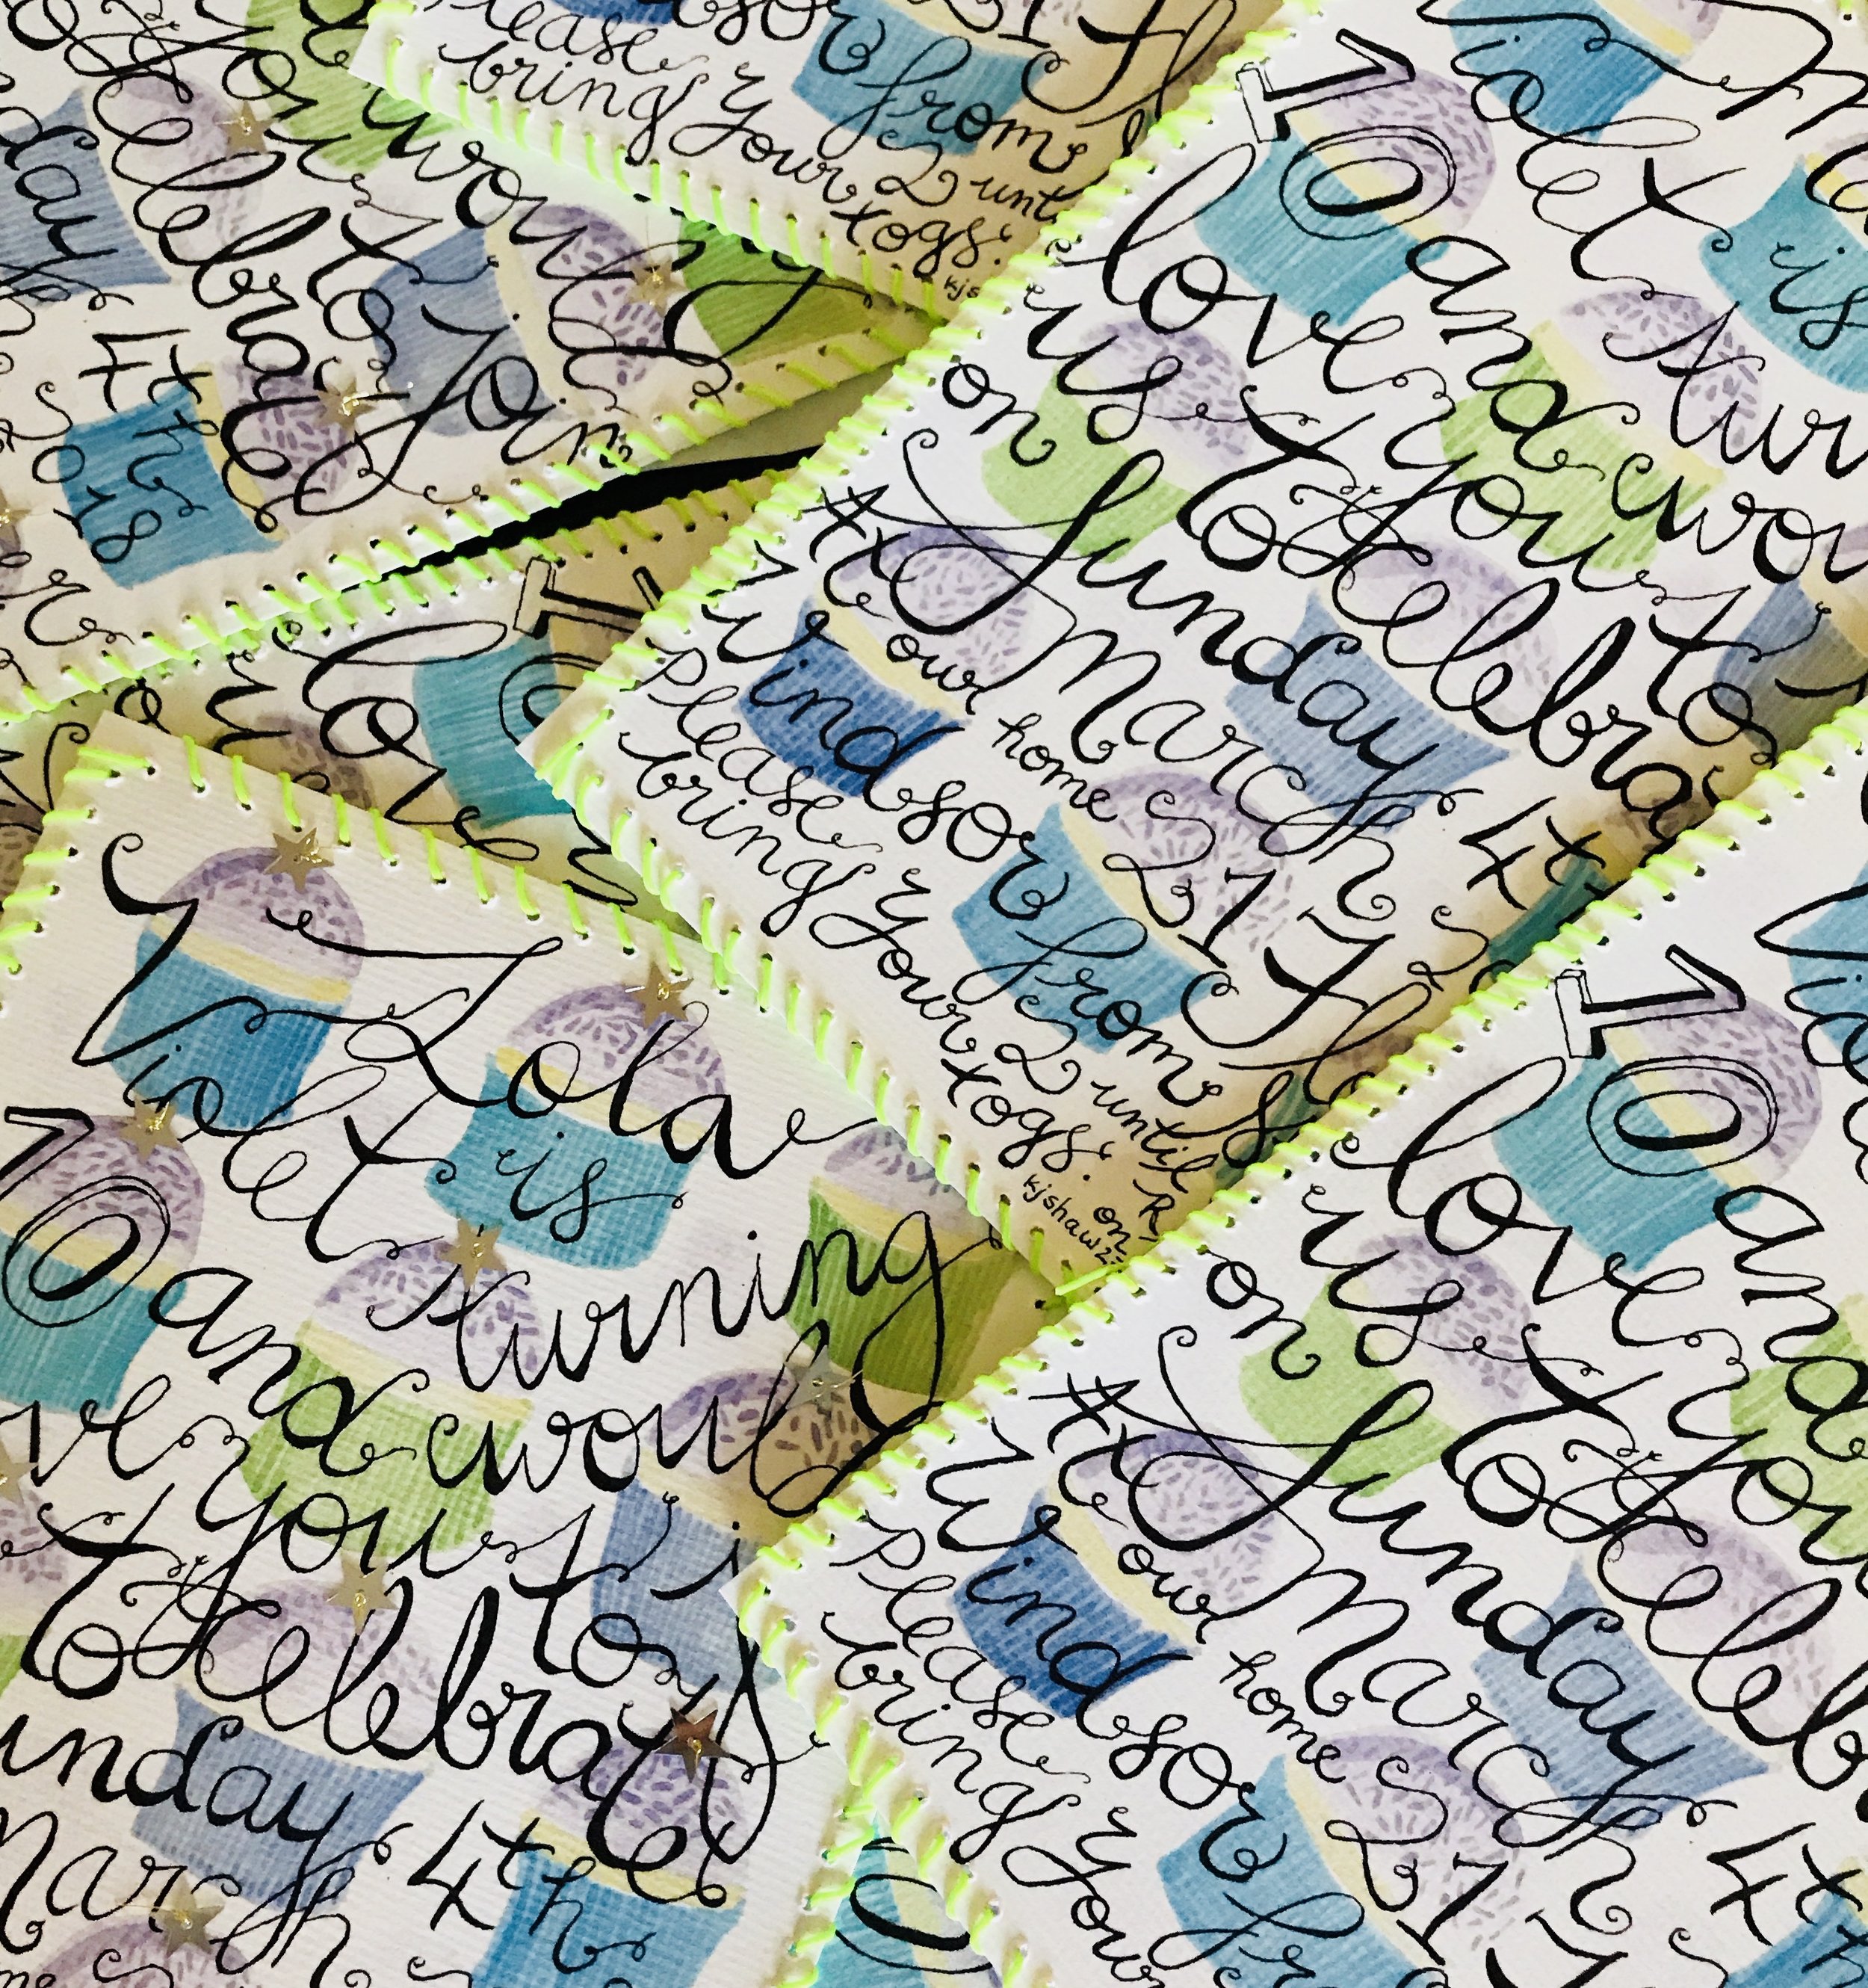
Beautiful invitations ... for a beautiful girl!
I had a lot of fun creating these invitations using a combination of watercolours, indian ink, nylon thread, jewellery wire and sequins. My youngest daughter Violet is turning 10 very soon and they are for her party! Birthdays are a such very good excuse to get creative! We're working on a few themed party elements for her celebration now too!